ID Coop | Spring 2024
HH Global P.O.P x ME
The Highlights of My Opportunities, Experiences, and Knowledge Gained during my semester at HH Global.
What did I do?
I served as a Structural Industrial Design and Graphic Design Coop for HH Global from January- May 2024.
HH Global is a global marketing execution partner with a promise of Big Impact for Big Ideas. HH Global specializes in providing a wide range of marketing materials and services across multiple channels, including print, digital, and promotional products. With a strong focus on sustainability, HH Global aims to minimize environmental impact while maximizing brand effectiveness, helping clients achieve their marketing goals responsibly.
The Cincinnati branch is mainly focused on point of purchase (P.O.P) corrugated cardboard displays for a wide variety of companies and brands from conceptualizing, prototyping, refining, to finalizing designs to appear in store.
Section I
The Project Process
Section II
Project Highlights
Section III
My Personal Project
Section I | Process Walkthrough.
Section one will walk through the typical process of designing and producing a display, utilizing a display I was able to design start to finish in the last month of my co-op.
Step One: Analyzing the Ask

CLIENT: Clorox
The Clorox Team reached out looking to create a display that features the pictured bleach products.
Clorox requested a quarter pallet (QP) with a 50/50 product mix of how ever much the display could hold. This QP was going to be pitched to the super center Meijer.
The challenge with this particular project was the weight. The products weighed in at around 10 pounds each, the design structure would need lots of strength and durability.

Step Two: Designing Structure
The structural design of this QP starts with creating a plan-o-gram and a build of materials, adding strength fillers to keep the structure from caving in.
1. Plan-o-Gram
Created using ArtiosCAD, the Plan-o-gram (POG) is a birds eye view of the structure shelving and product layout.
I was able to fit nine of each using the product measurements, so 18 total bottles.
The green blocks symbolize the structural fillers and dividers. They keeps the product from moving in transit while also providing necessary structural strength.


2. EST Build of Materials
The estimated design build of materials (BOM) created in ArtiosCAD.
Two tray pads were added for strength and were also adjusted to be a stronger grade (C flute and BC flute).


Step Three: Designing Graphics
Before proceeding with structure testing, the Clorox team needed to approve the BOM and POG design. This includes sending a rendering based on their request. Originally, the team did not have any graphic direction in mind.


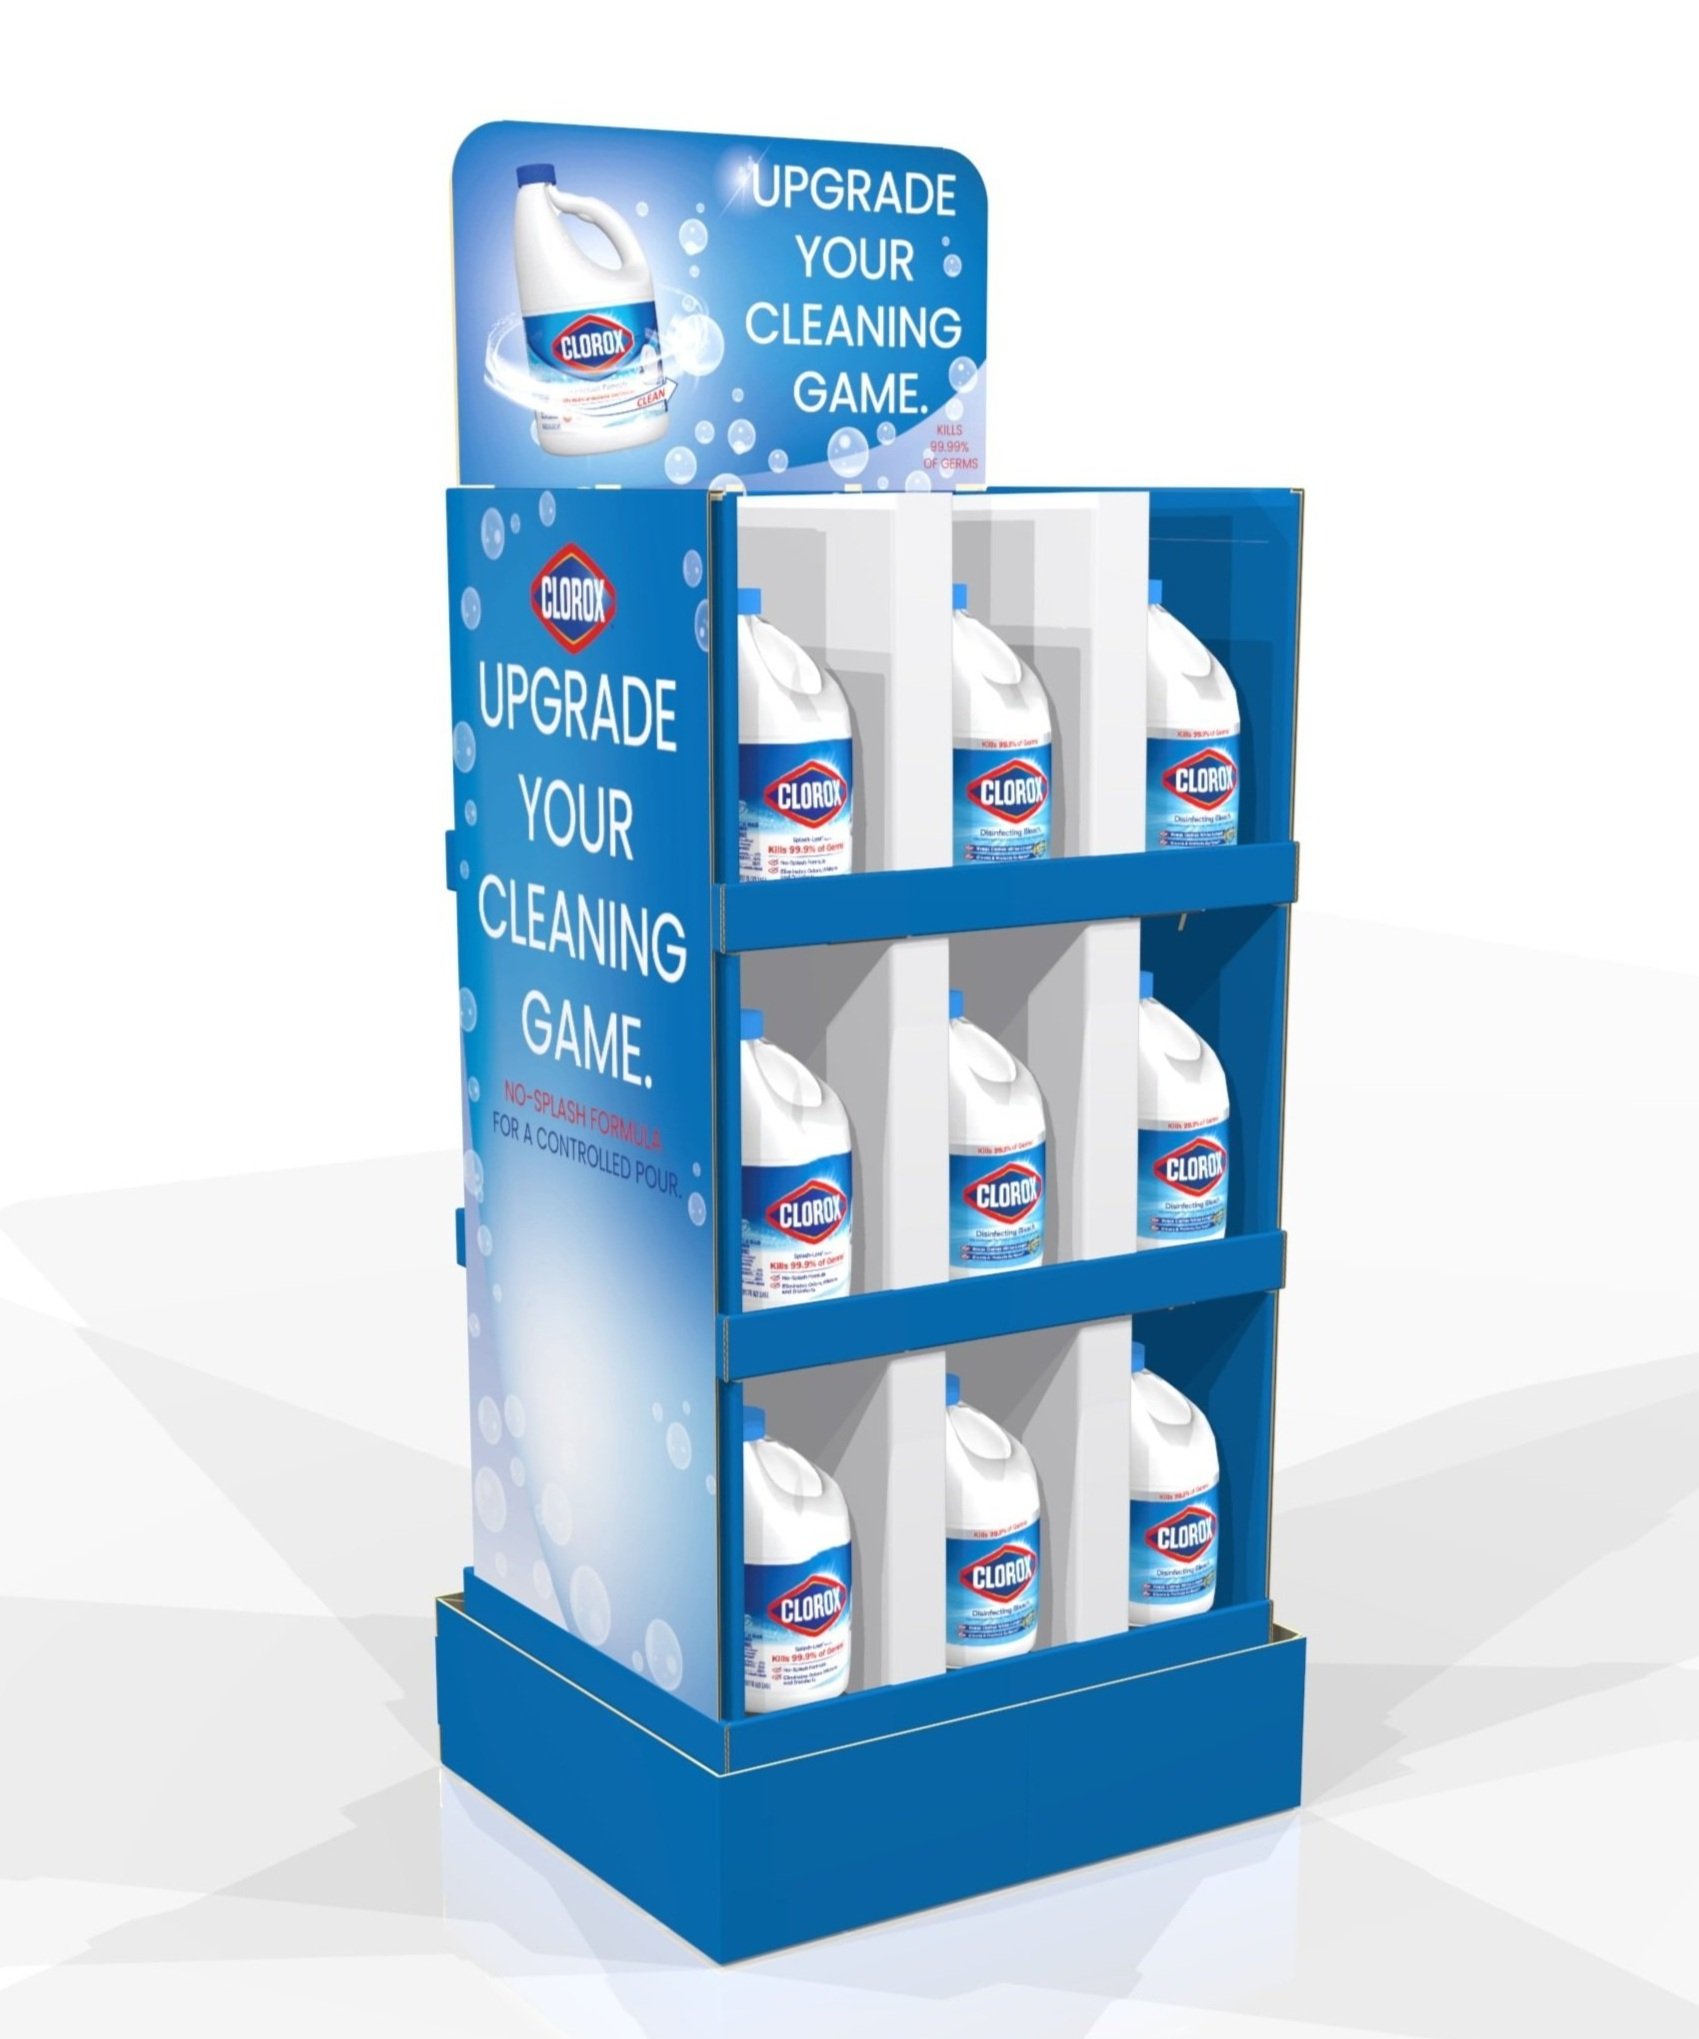
Design A.
Creating two versions of graphics for the original review.
Design A adhering to light and airy mood, matching the product appearance.

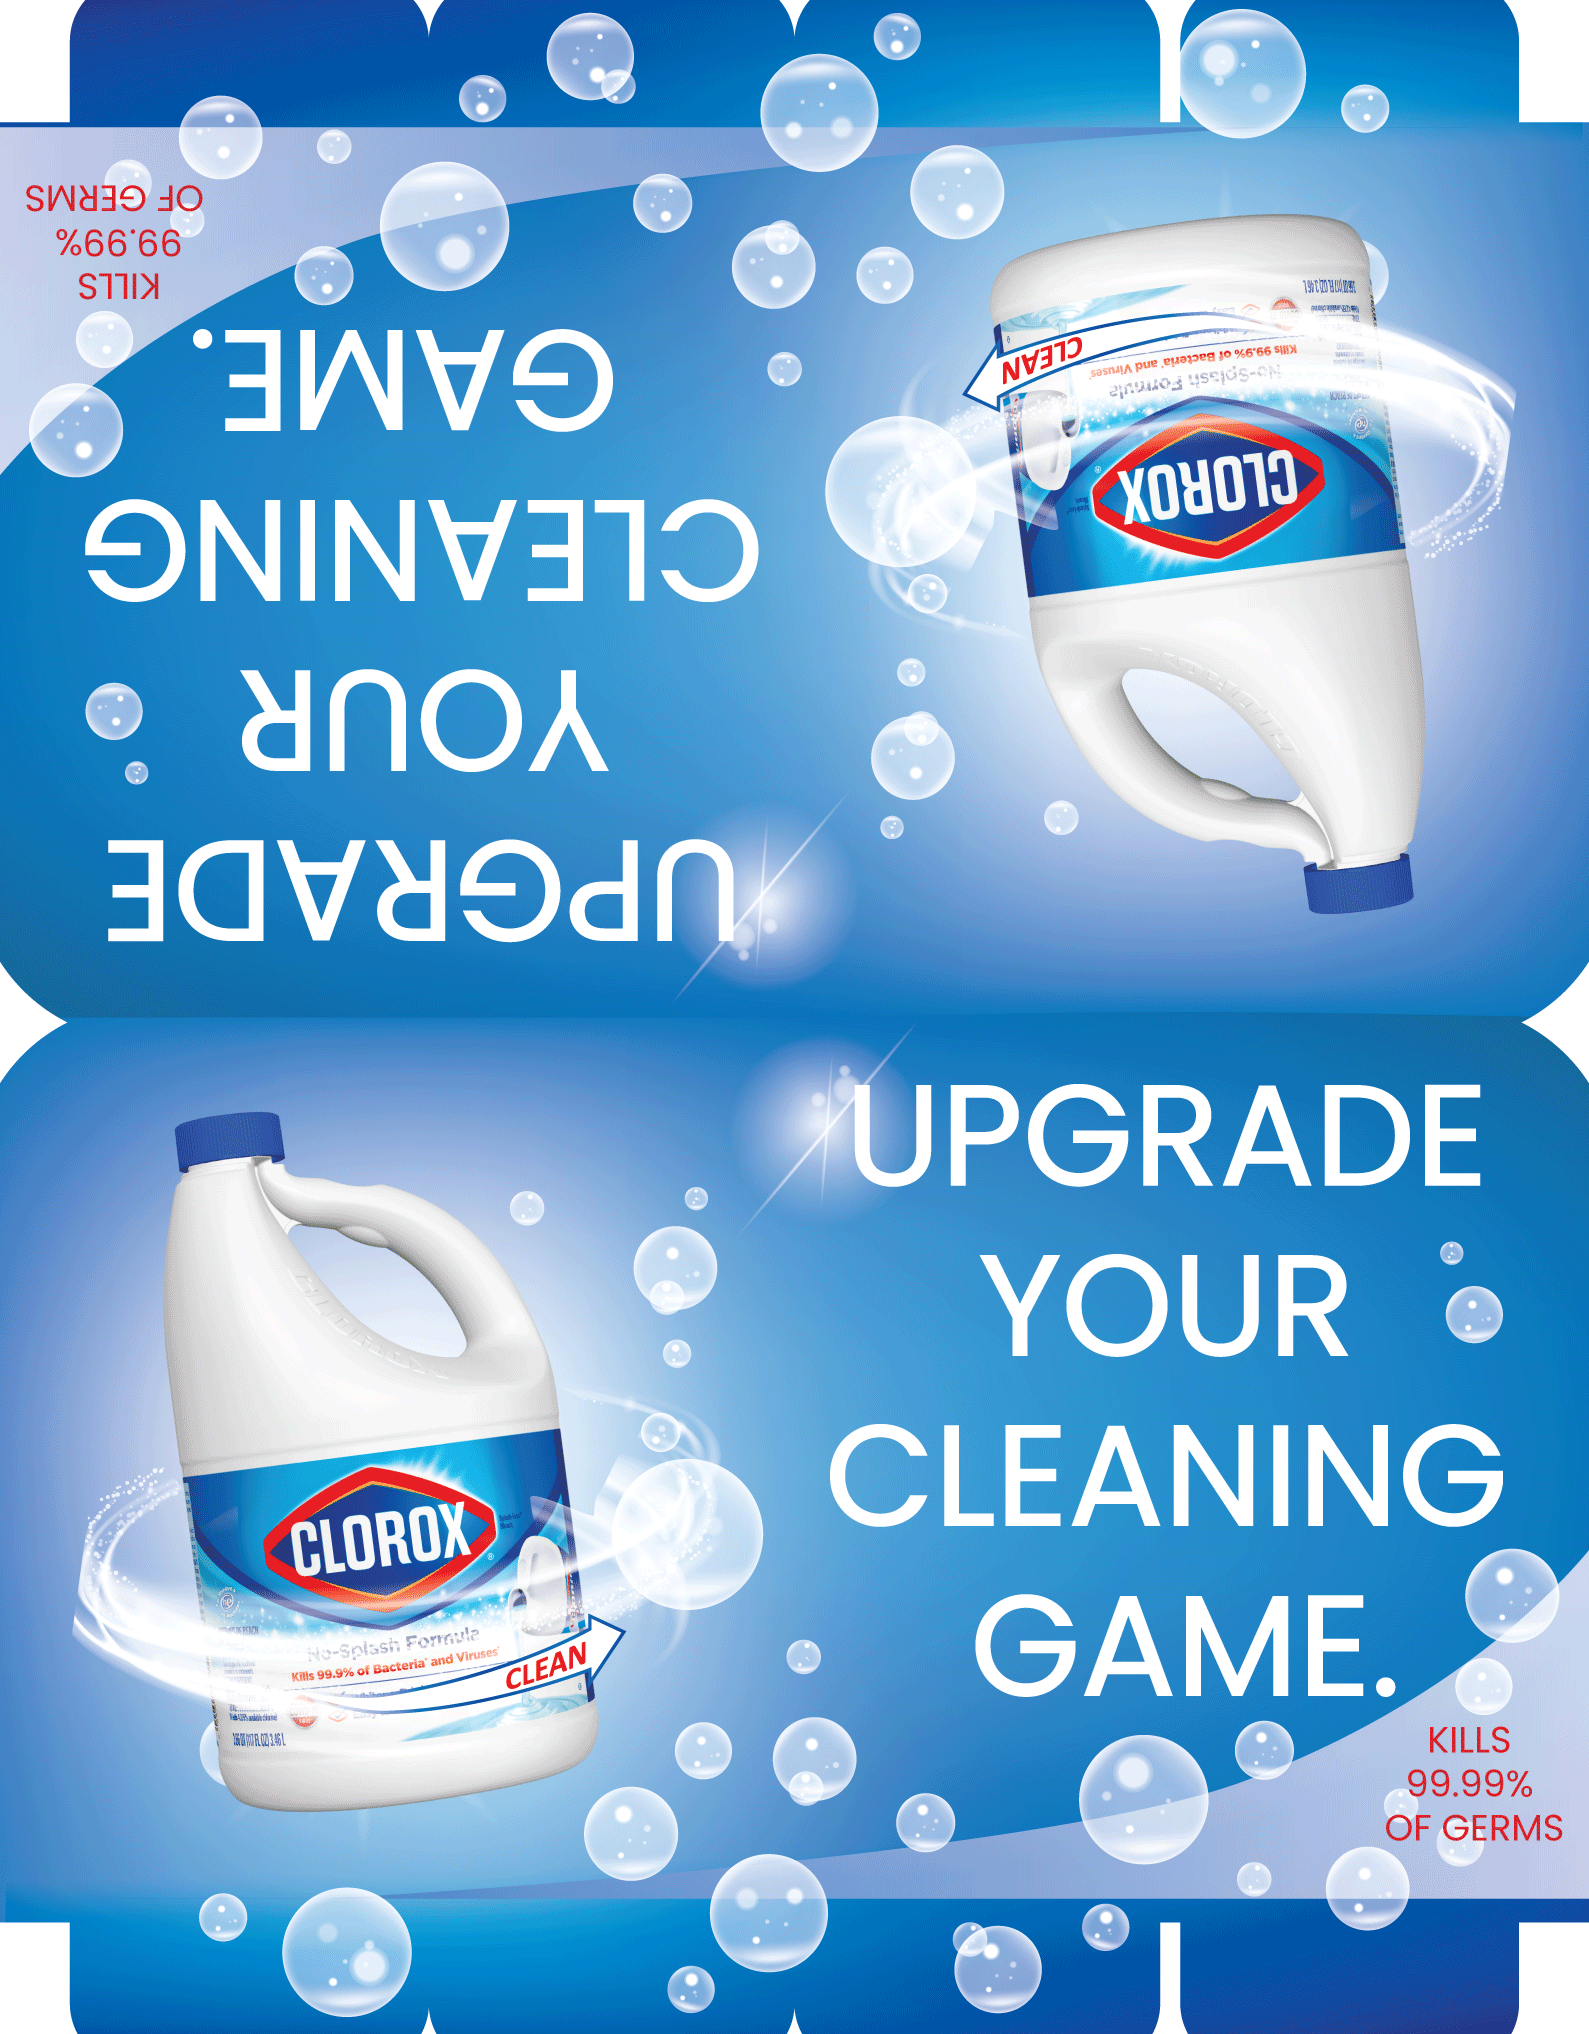
The Brand.
With no original graphic direction given, the design inspiration began with research into Clorox marketing assets.
Looking at color dynamics, font, aesthetic, and layout.
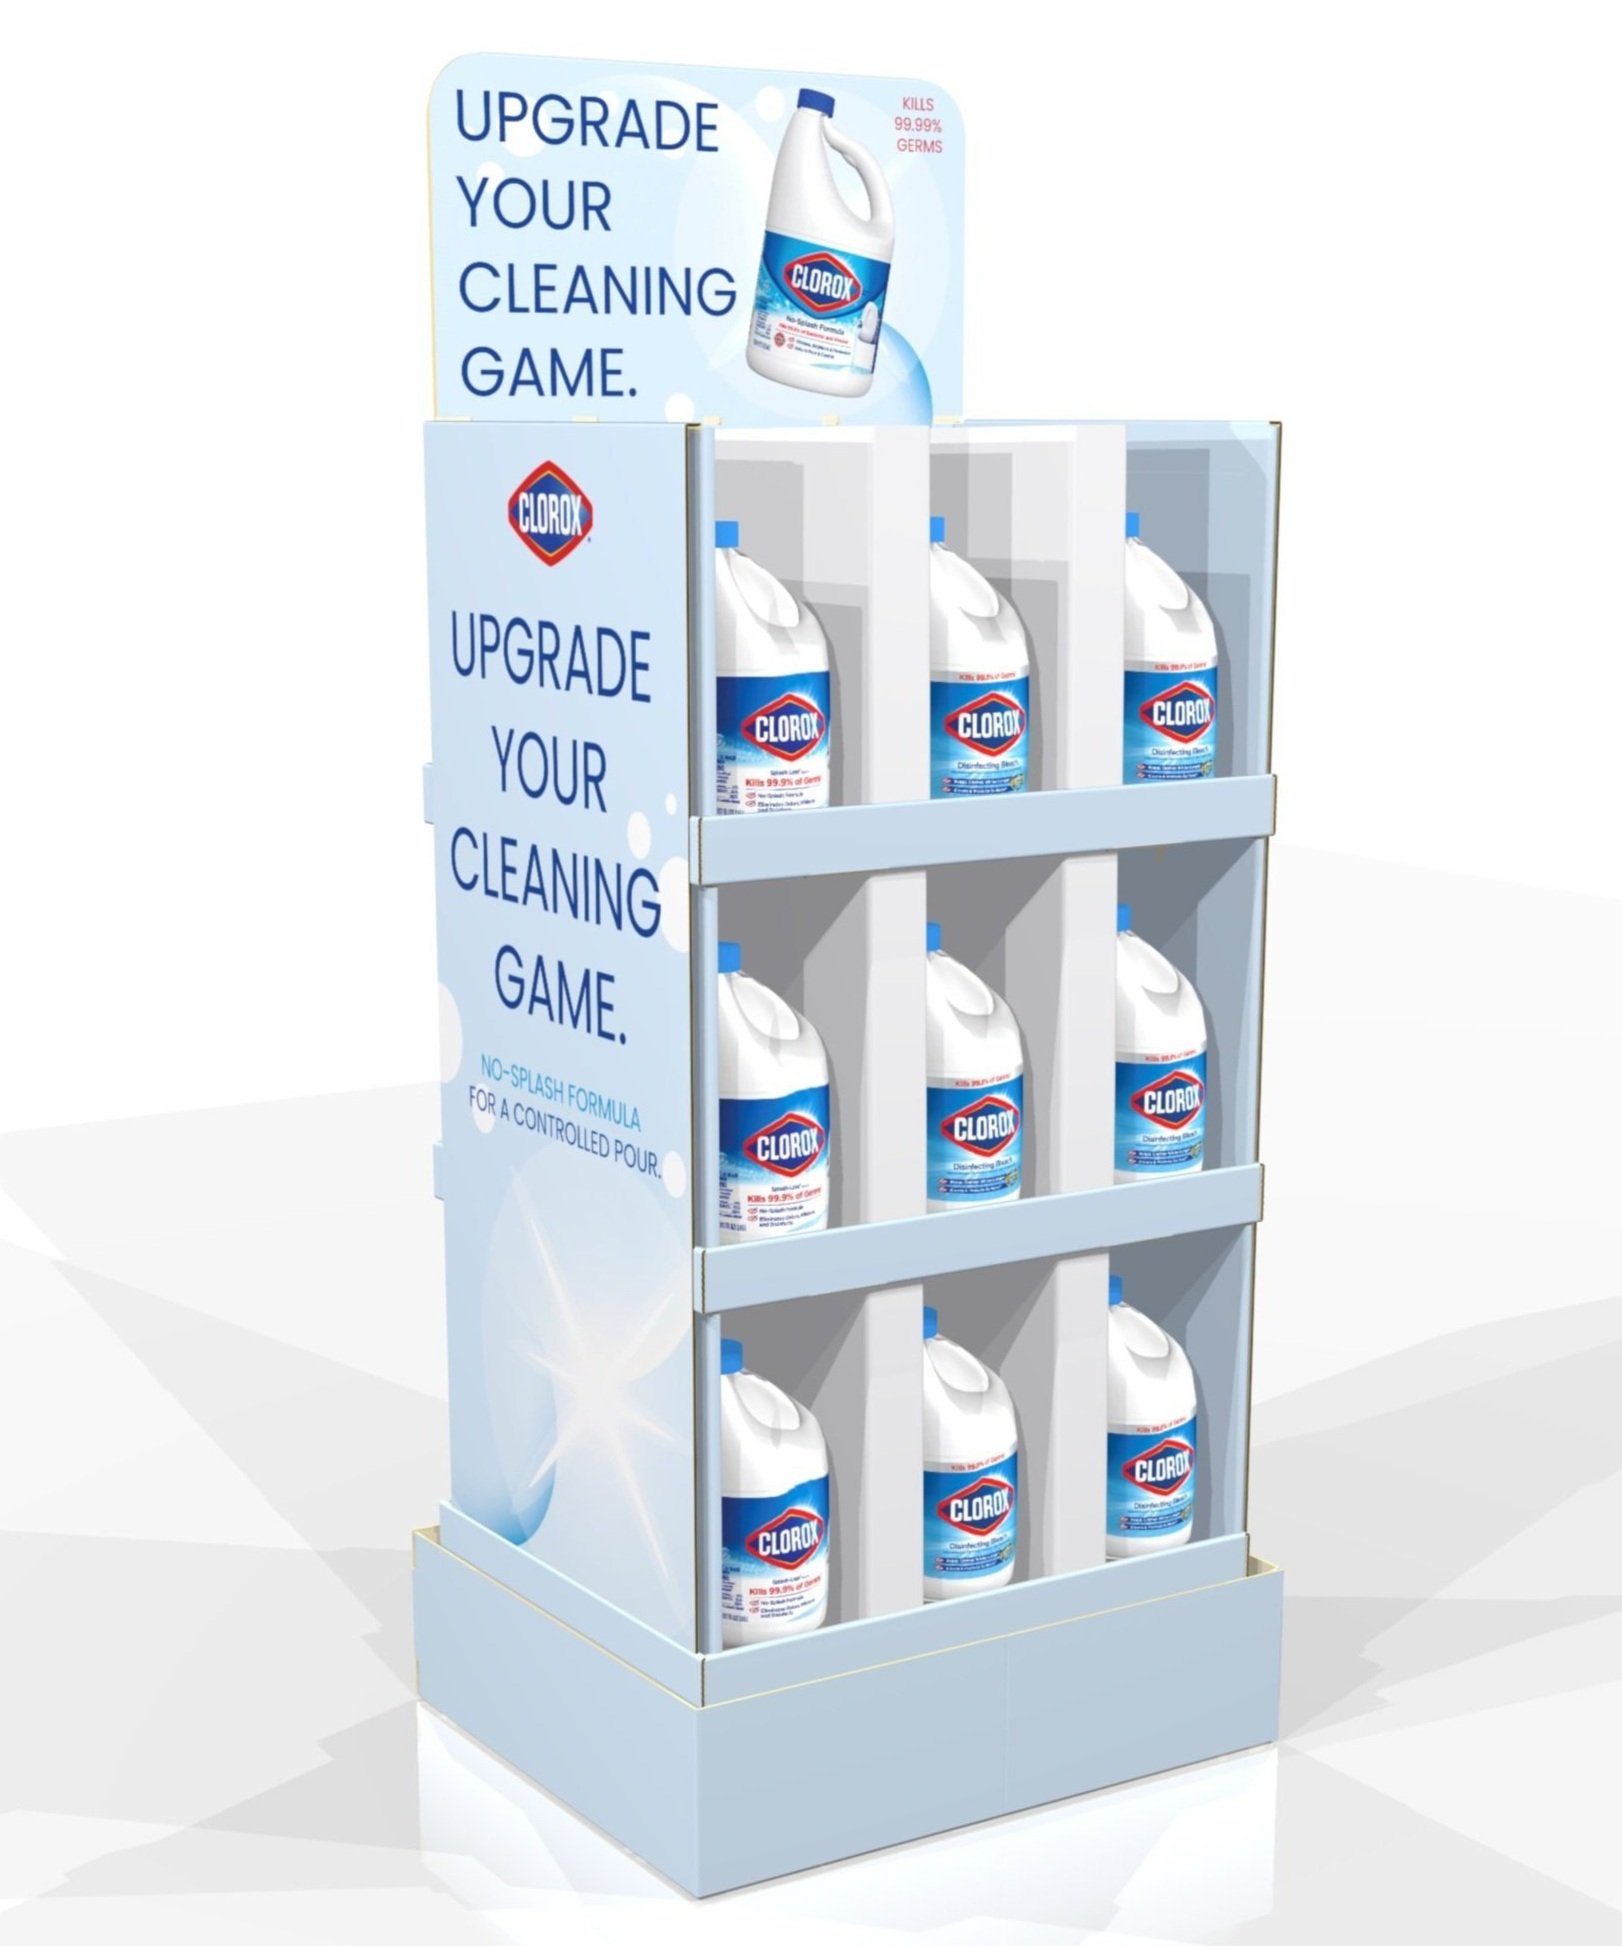
Design B.
Design B adhering to a cool and bubbly mood, matching the brand graphics and logo.

Step Four: Graphic Review and Revision
Once the structure and renderings are sent out, the client responds with reflections and new revisions are made before final approval. All graphics are made in illustrator and photoshop on the outputted dielines, then rendered in 3ds Max.
Clorox Feedback

Clorox approved of the structure and wanted to proceed with design A.
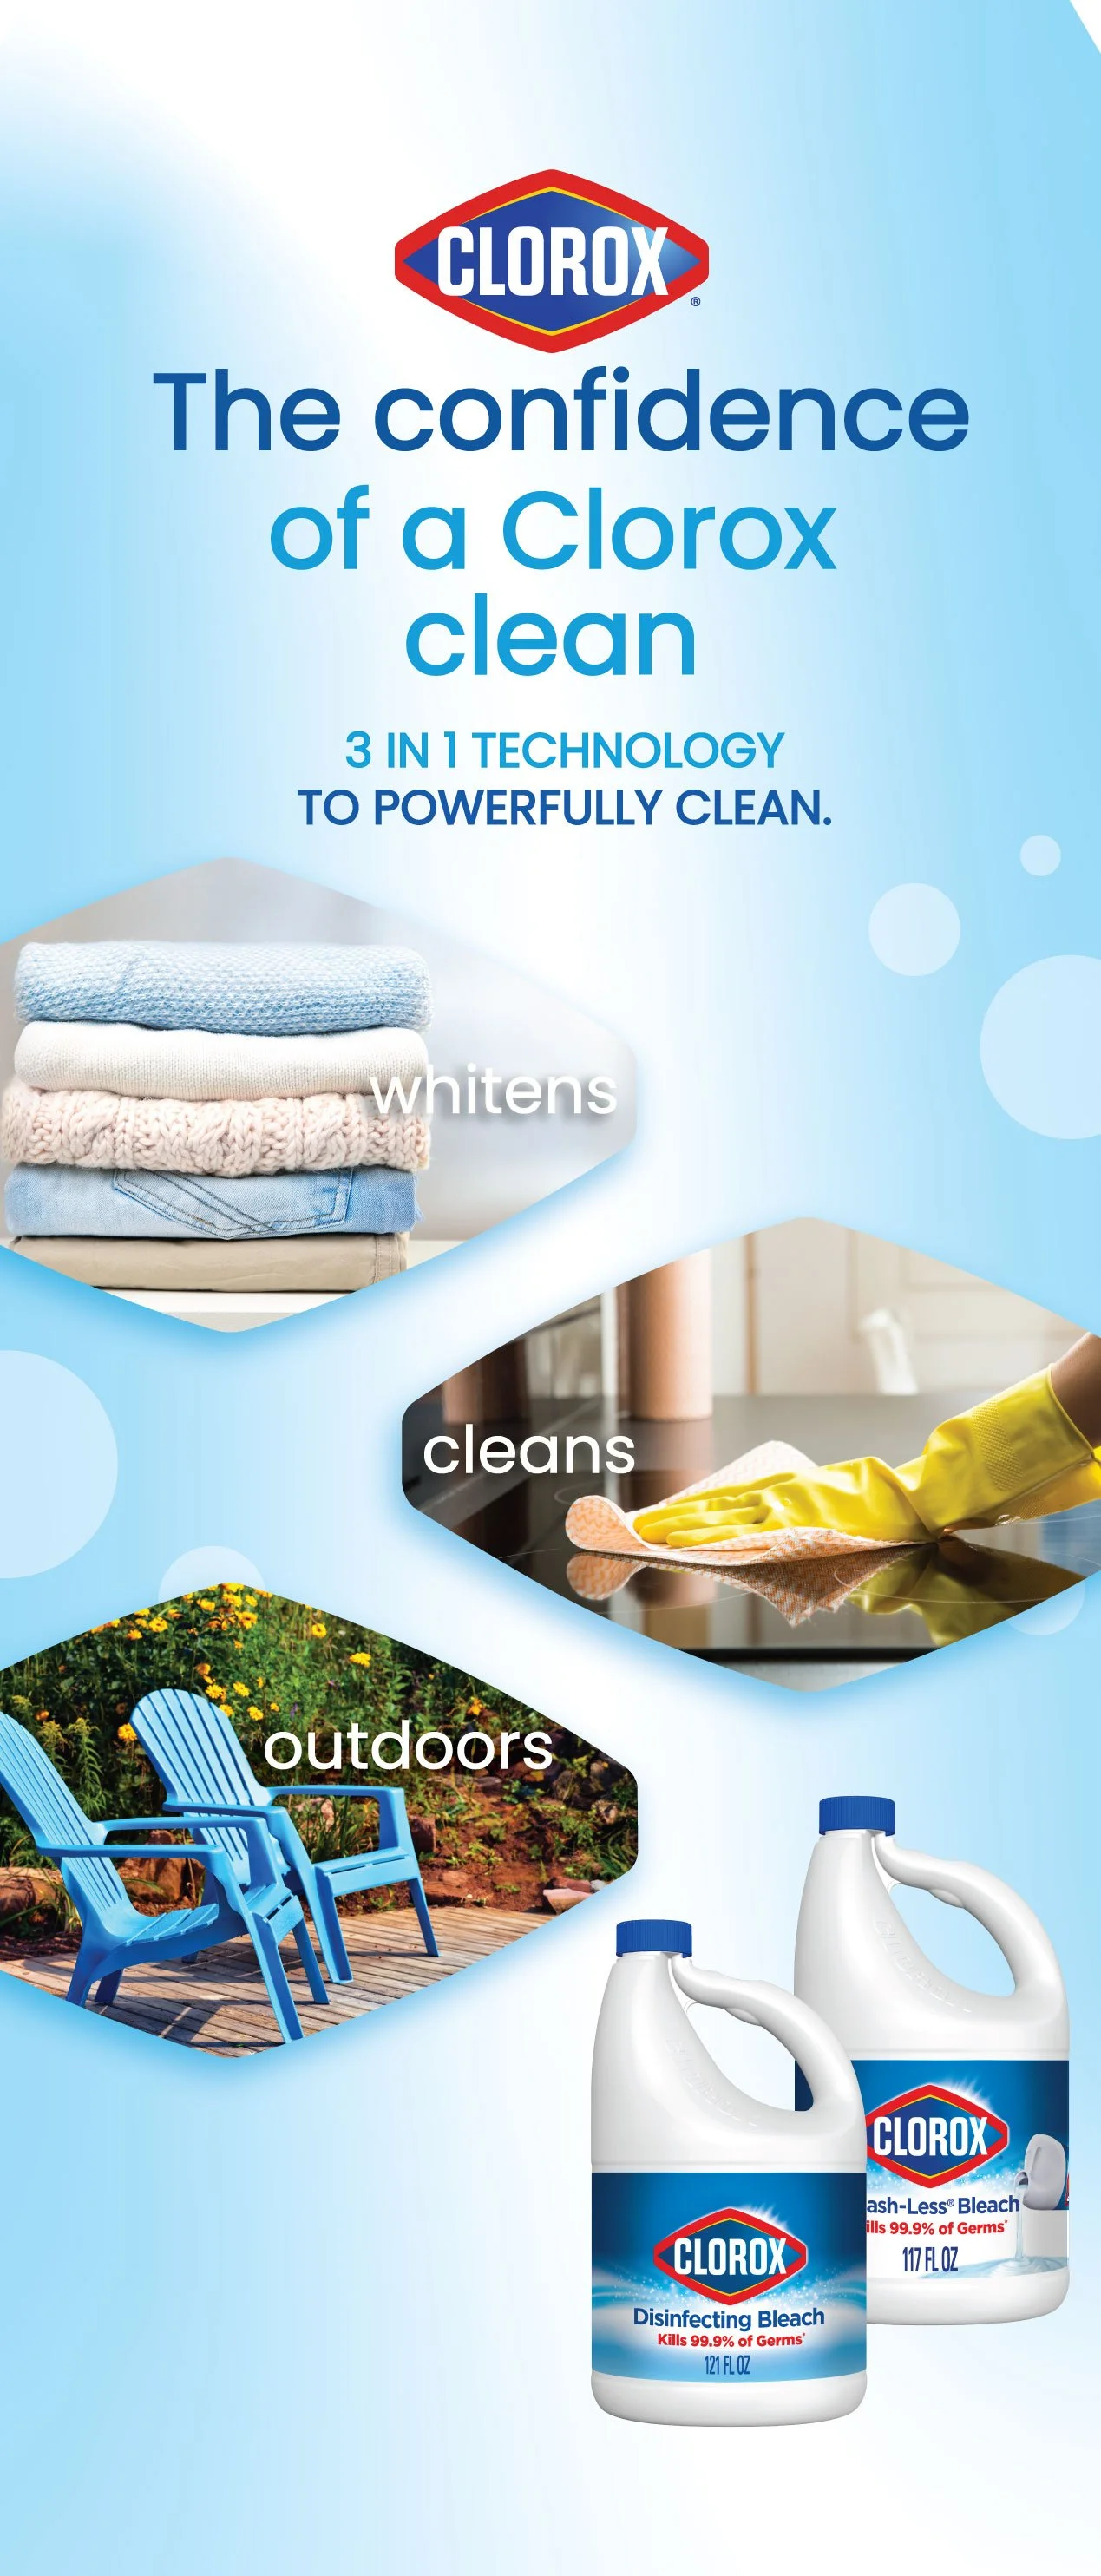
Meeting with their team, deciding to add “the confidence of a Clorox clean”, both product shots, and real life imagery. Clorox approved and pitched the design to Meijer.


Meijer Feedback
Meijer returned with minimal changes, requesting subtext to be changed to “whitens, cleans, outdoors” with updated imagery on two of the side panel images. No changes to the header.
The project was officially ready for final documents and testing.
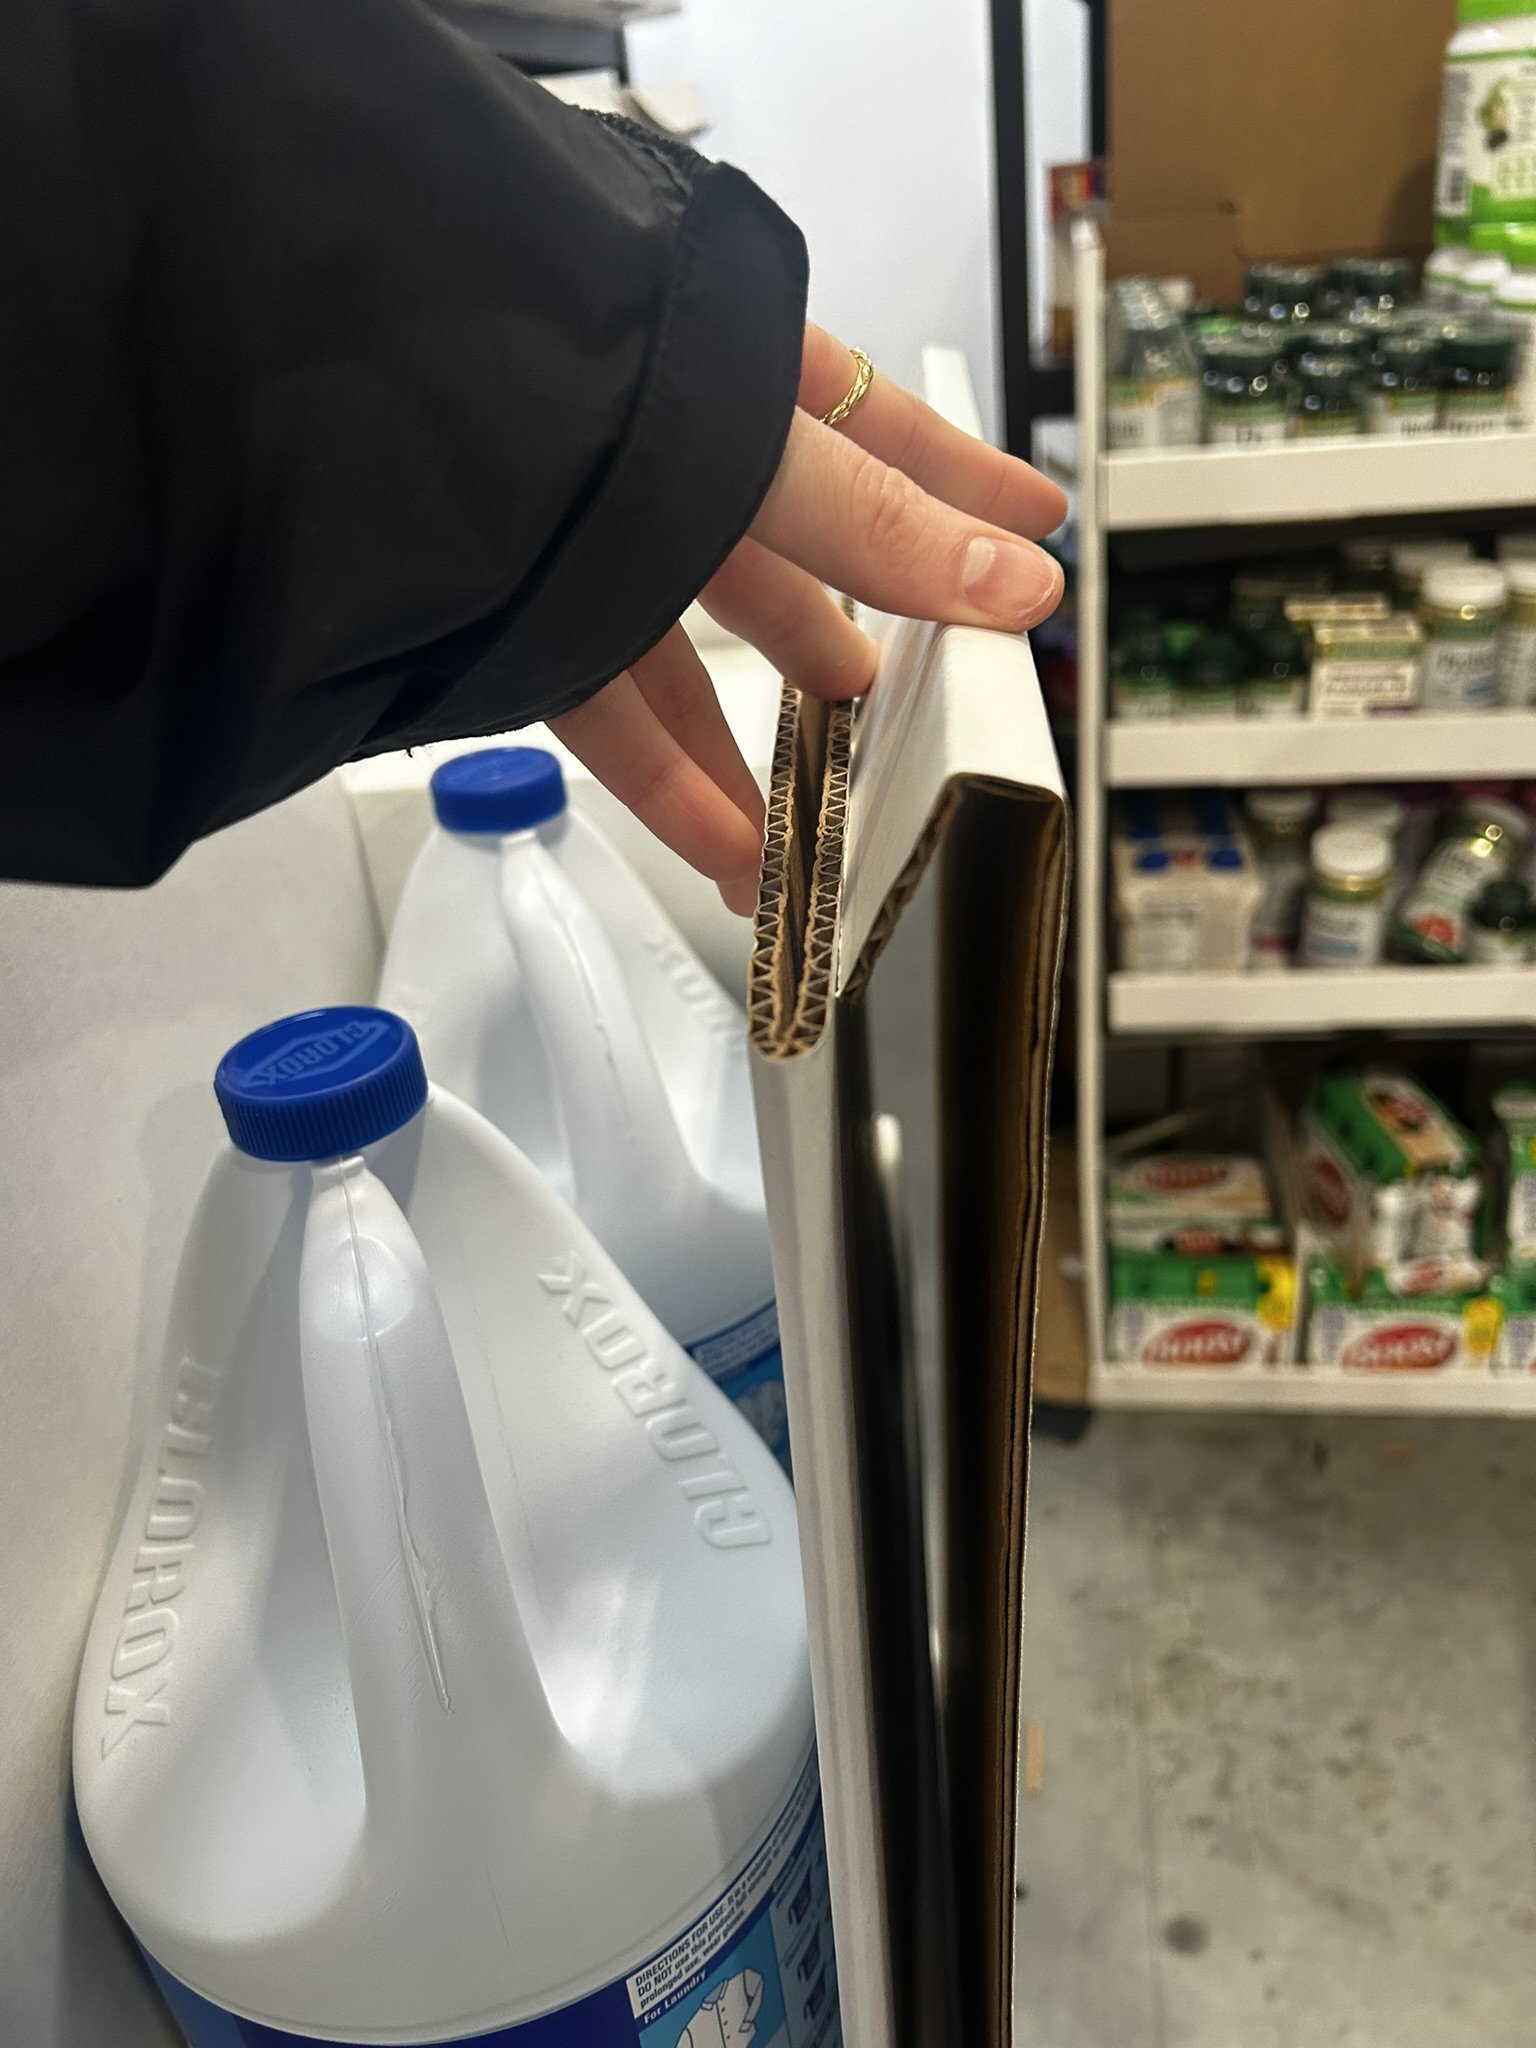
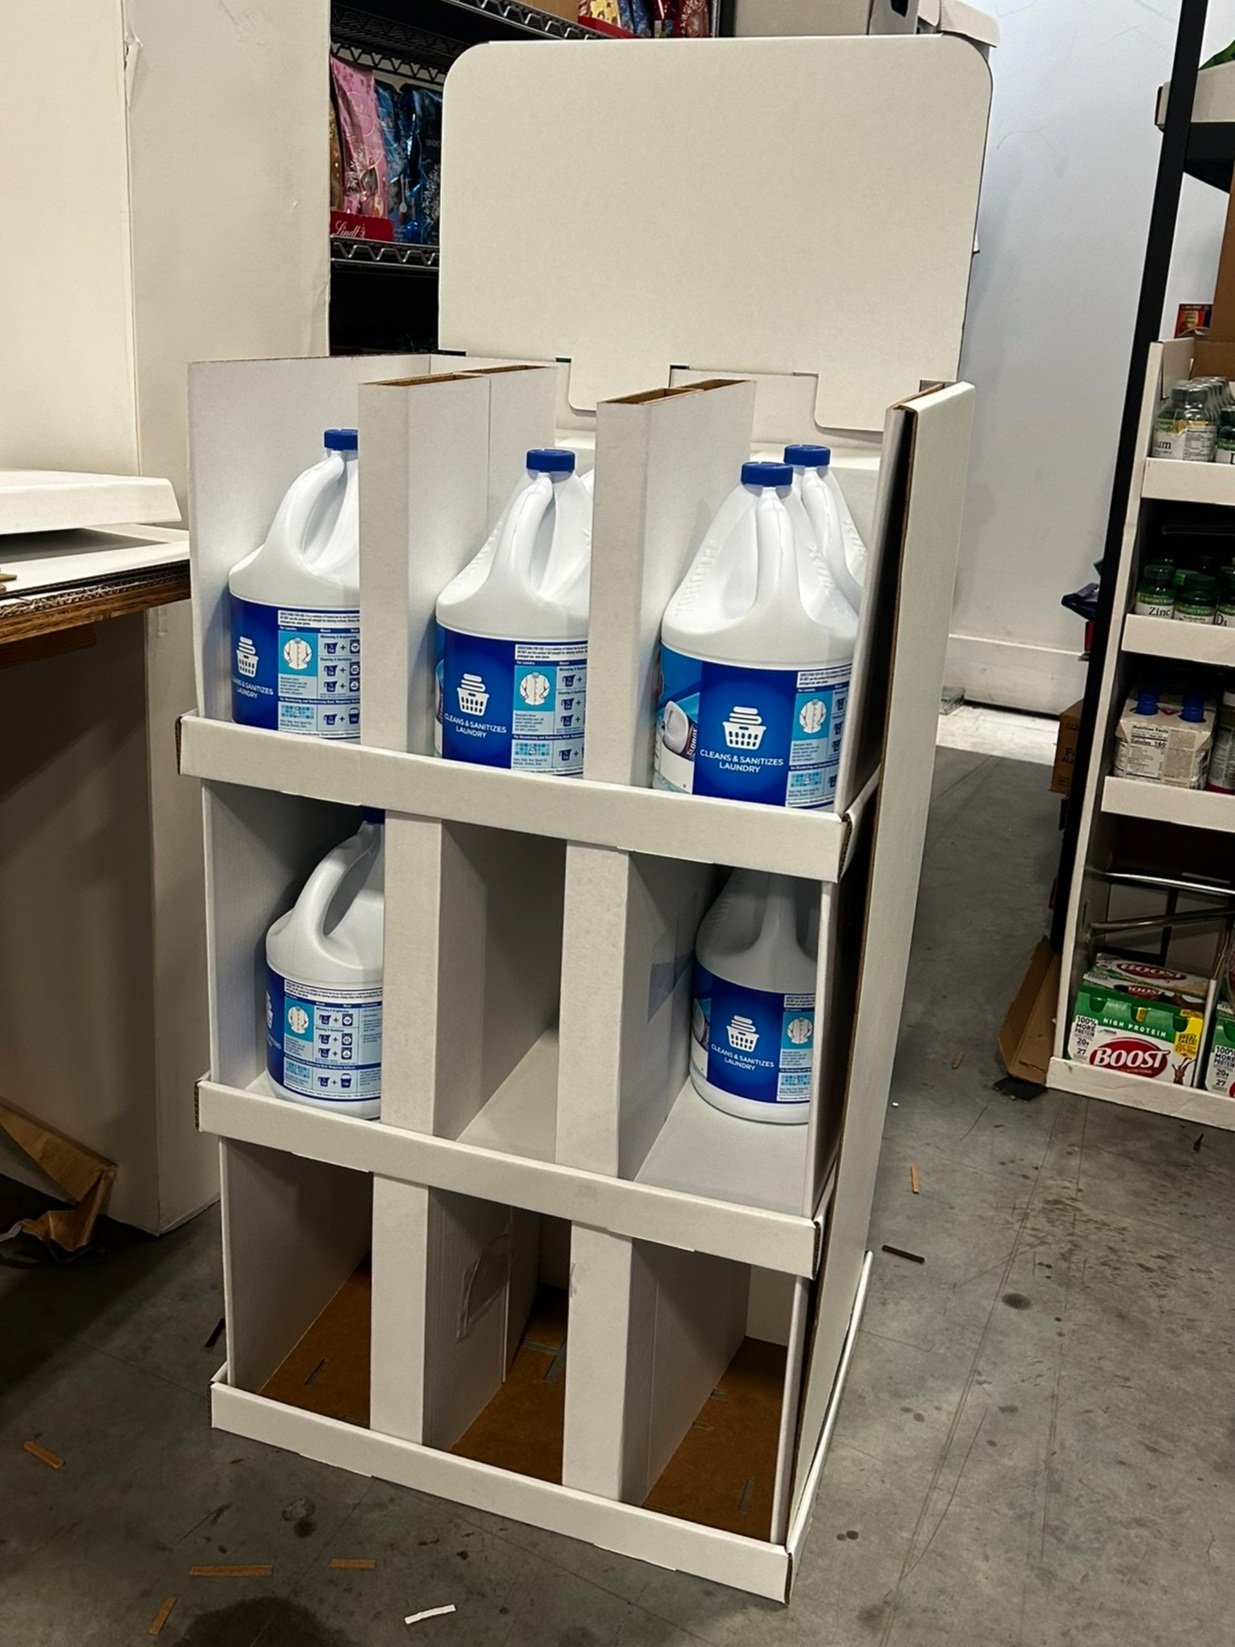
Step Five: Final Structure Testing
To ensure the structure is functional, a white-cut build is made and tested using the exact products in the display. The prototype testing revealed two changes were necessary before final production.

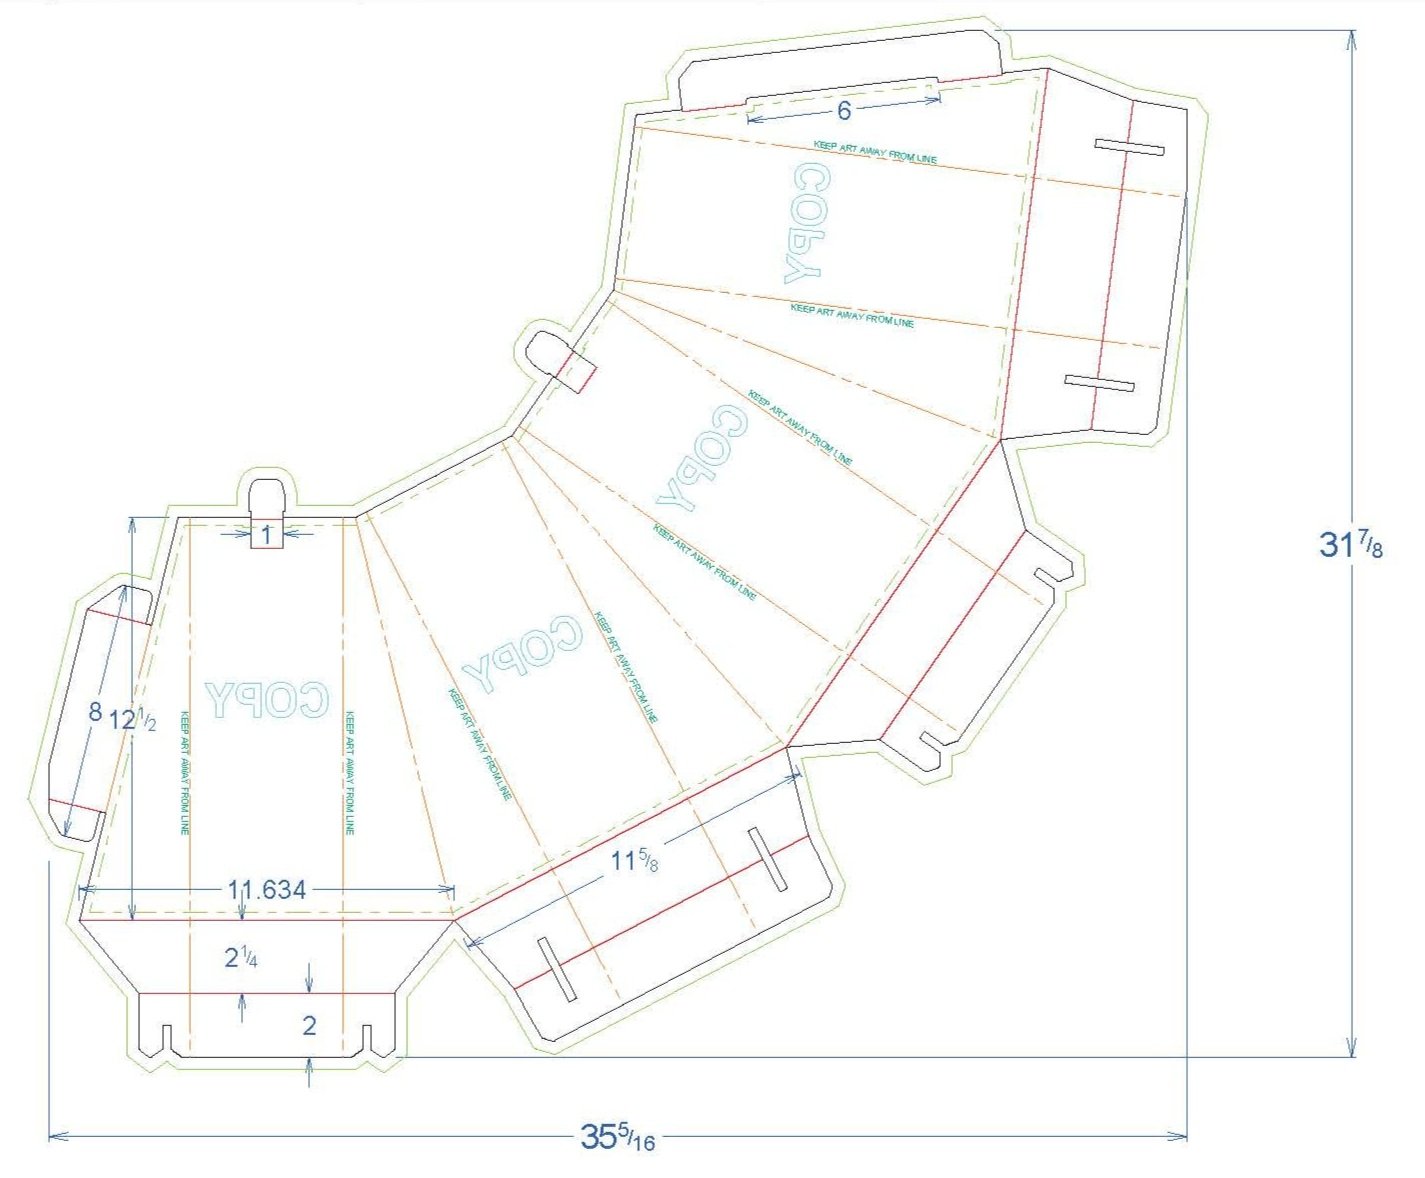
Setting up the files on the table, programming each piece to the corresponding board grade.

The machine creates the creases, cuts, and perfs from the design file.
Structure Change 1.
The divider fillers were too wide for all of the product to fit and were shortened, allowing for space for the bleach product to sit snug.
Luckily, the dividers were strong enough to hold the weight of the product, meaning the back walls could be changed from EB flute to C flute (saving on cost of the display).
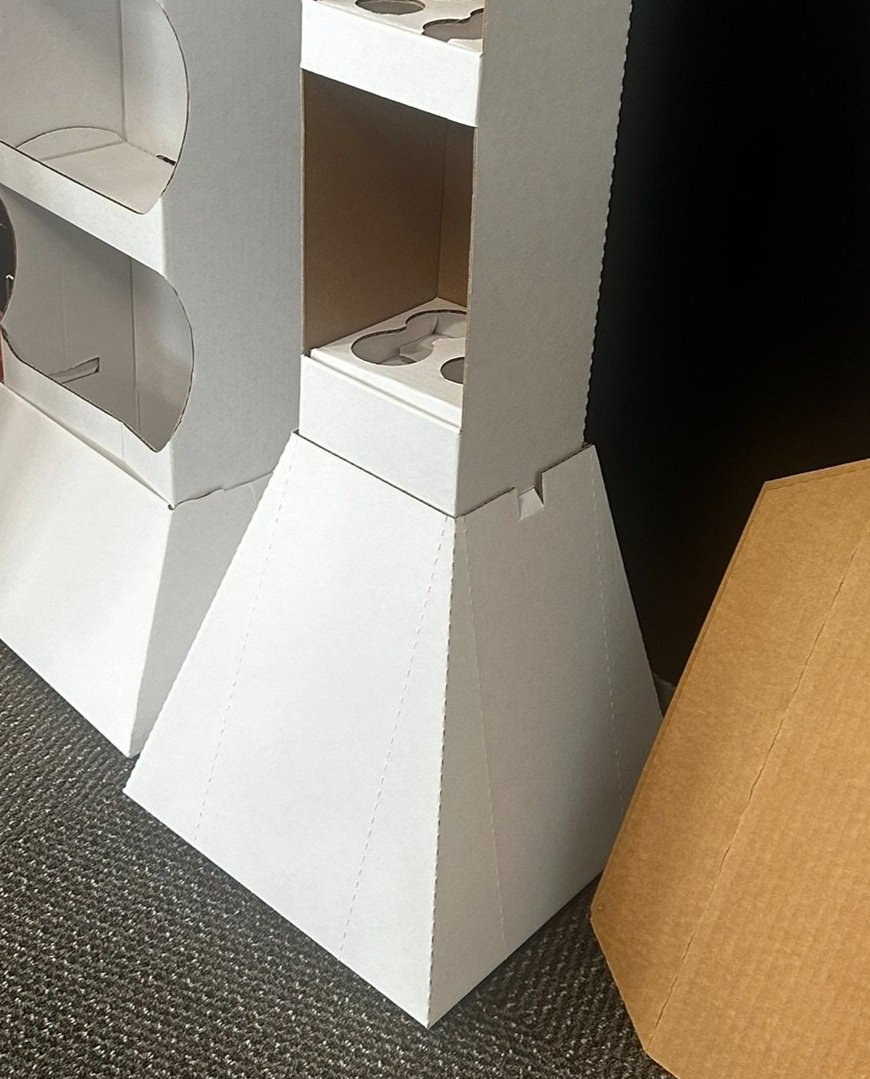
Structure Change 2.
The Graphic Panel was too long for the overall height. It was bowing on the side which would cause issues in shipping and appearance.
The panel was shortened and the graphics were edited for the updated dielines.

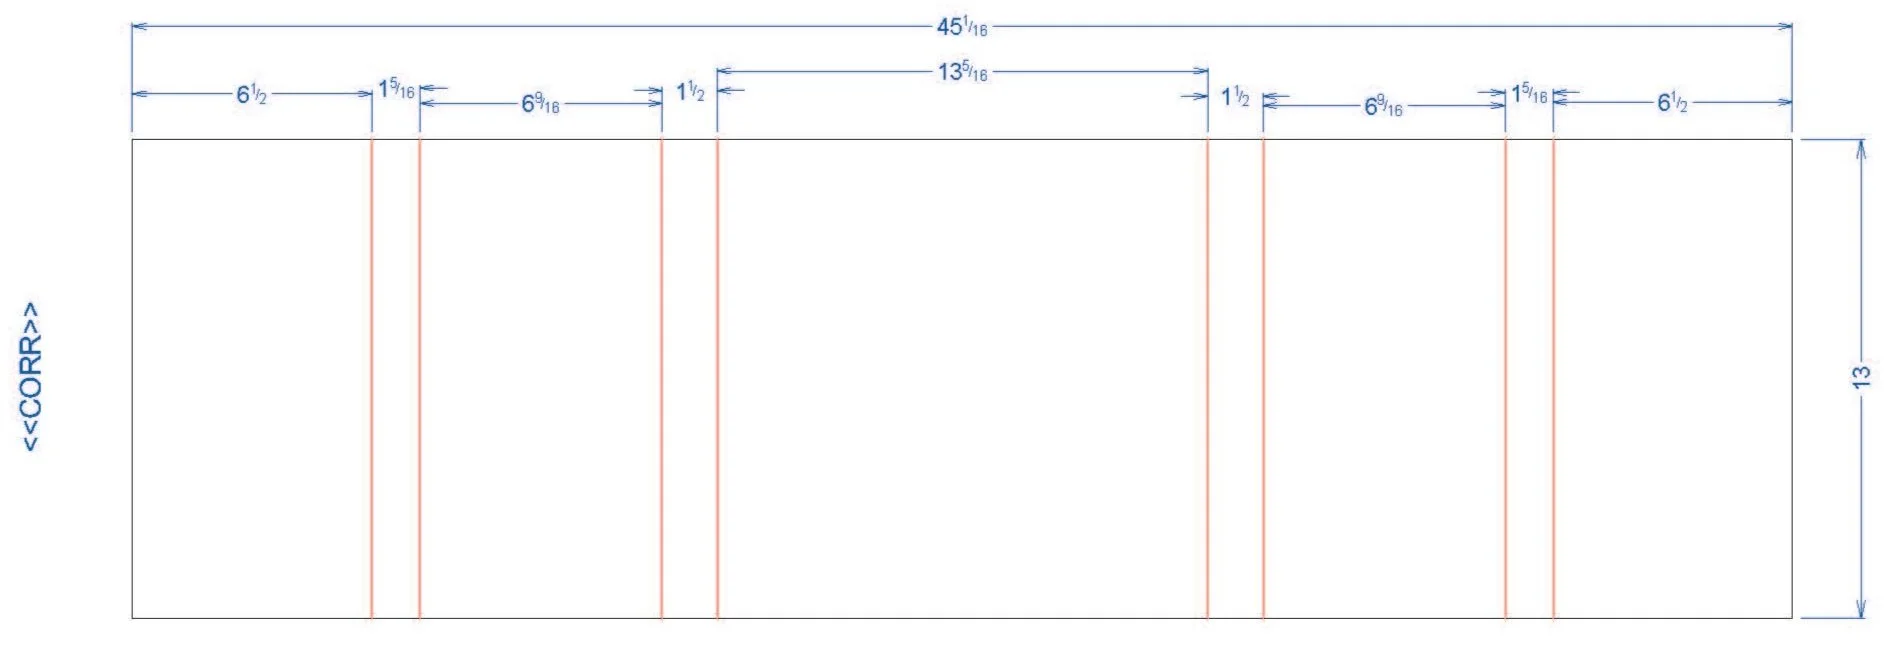
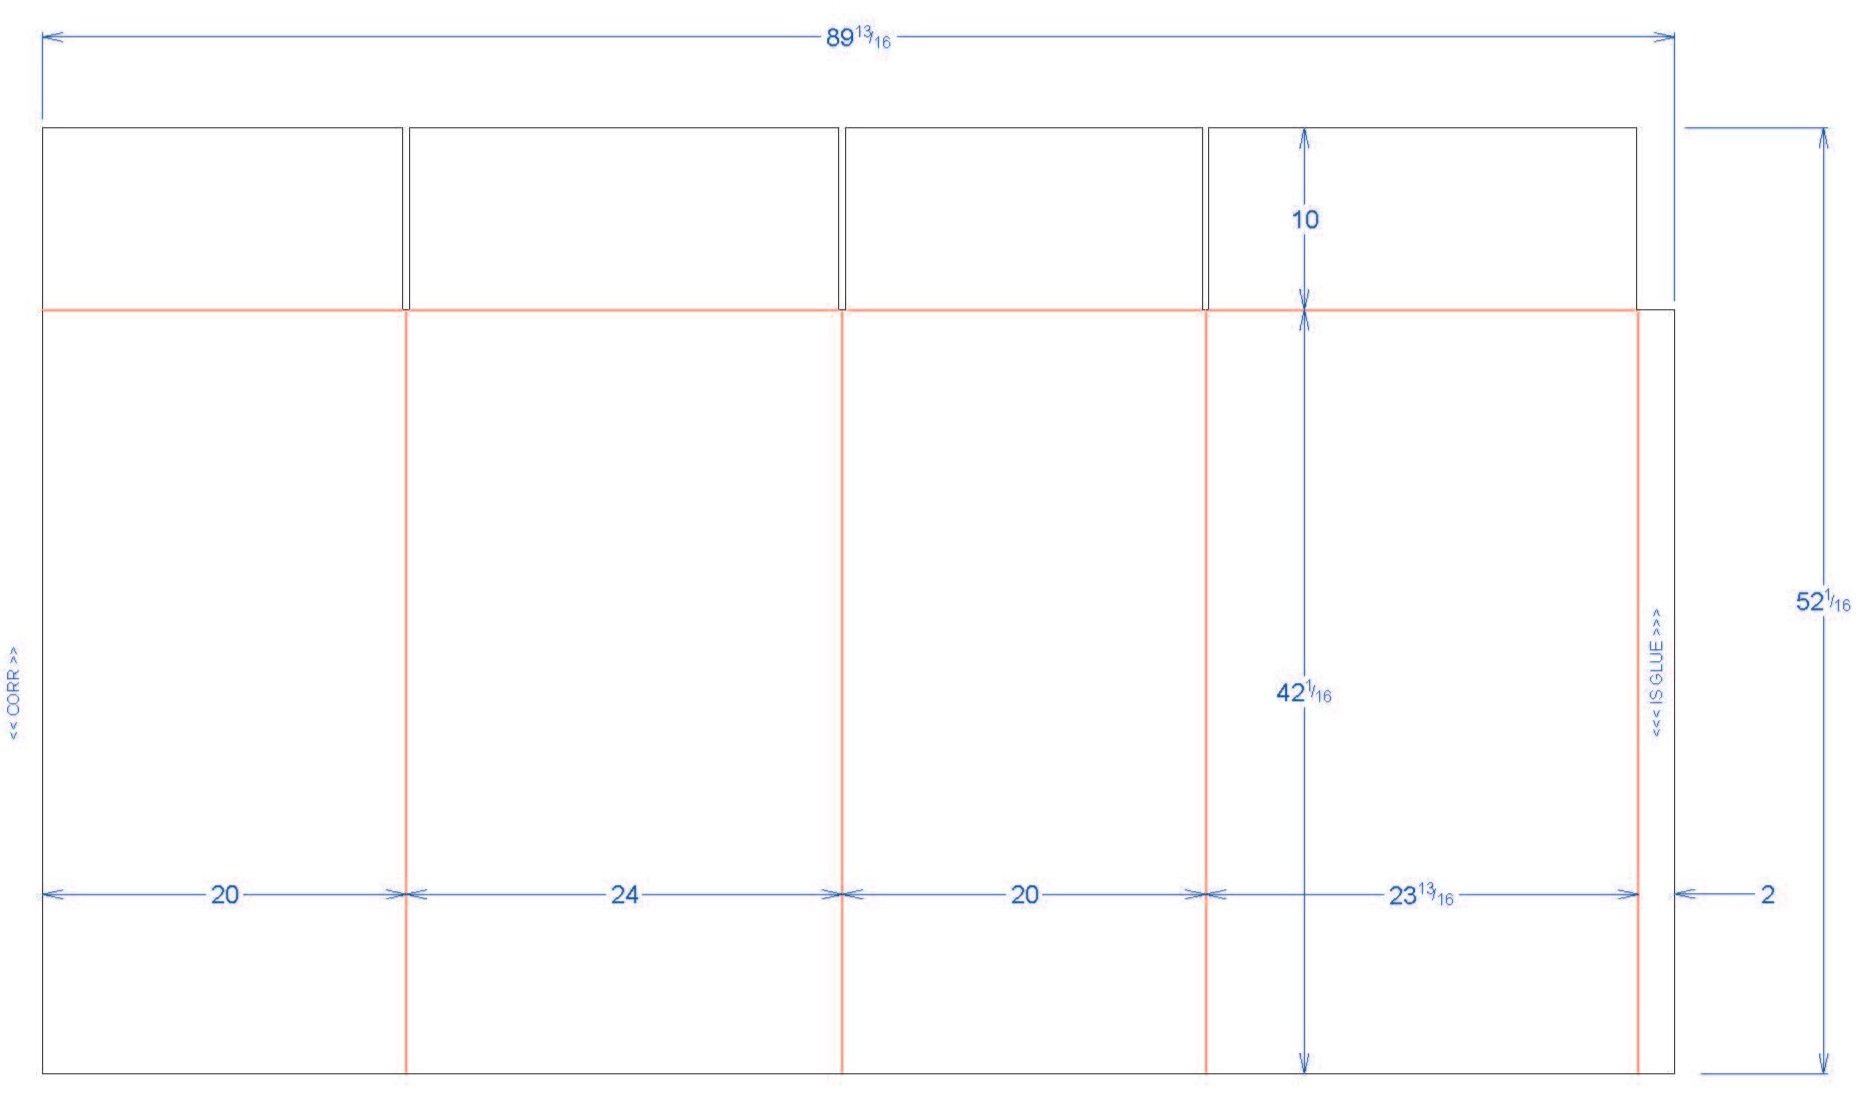
Analyzing the ease of the process while building and if it is an intrinsic construction for the user.

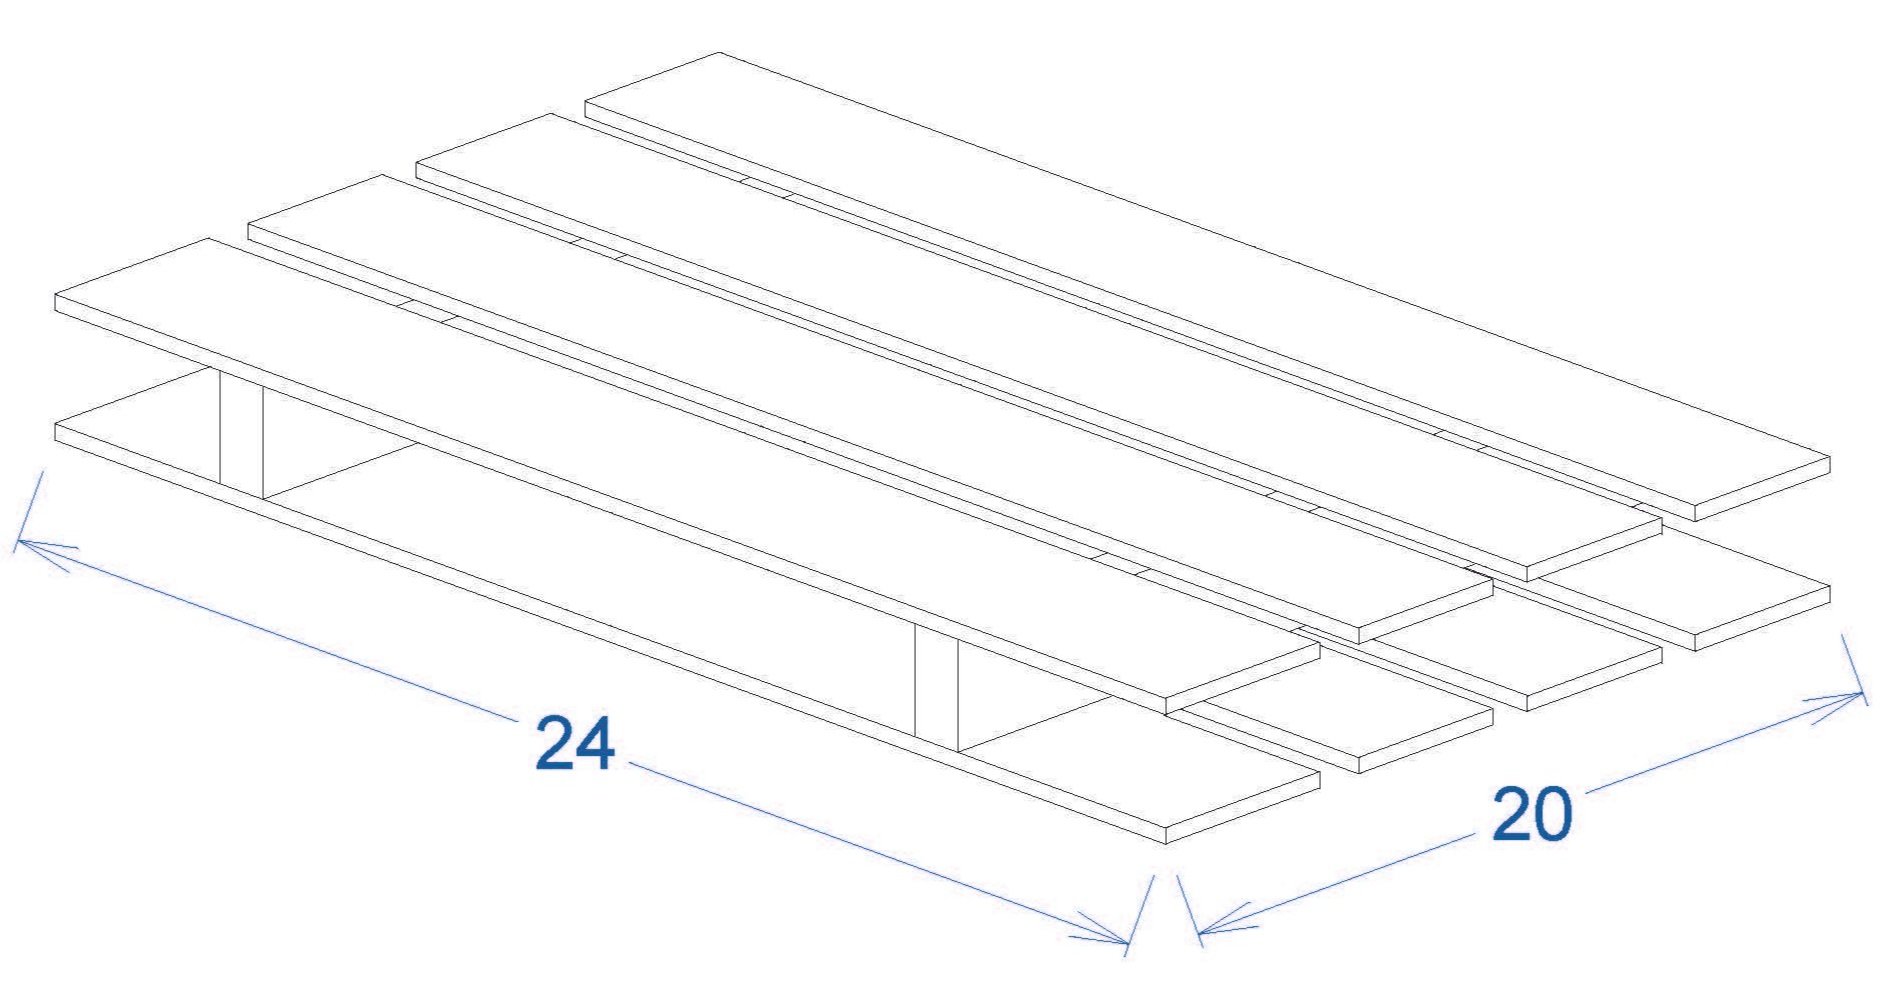
Estimated Divider Size

Estimated Side Panel Height

Finalizing the display build before adding the actual product and fillers per the POG.

Production Divider Size
Production Height (tucks into bottom shelf)
Step Six: Final Documents
When the display is set for production, final documents are output and looked over in a final review meeting with the project manager, sourcing team, and head designer. This includes the final POG (unchanged), LRC, CAPE, BOM, and Instructions.
Final Labor Rate Card (LRC) and CAPE
The final LRC analyzes the amount of time and cost the display will take to make in production.
The final CAPE analyzes how many of the displays can fit on the truck (the more the better) using the size and weight.
Final Production Build of Materials (BOM)- changes highlighted

This display double stacks, fitting 8 displays per pallet.


Final Instructions.
Using illustrator to create final In-plant Assembly Instructions (IAI) and Retail Assembly Instructions (RAI).
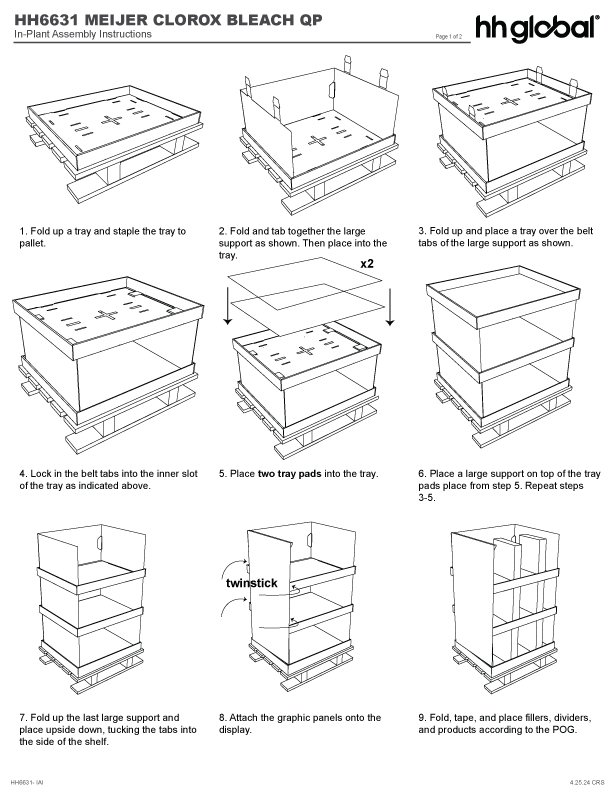
IAI Page 1/2

IAI Page 2/2

RAI Page 1/1
The Final Clorox Bleach QP will launch in June 2024 at Meijer Supercenter.
Section II | Notable Highlights.
Section two will go over structural design and graphic design highlights from all the different projects I worked on during my co-op. My favorite jobs, victories, and innovations will be showcased- some going into further detail.
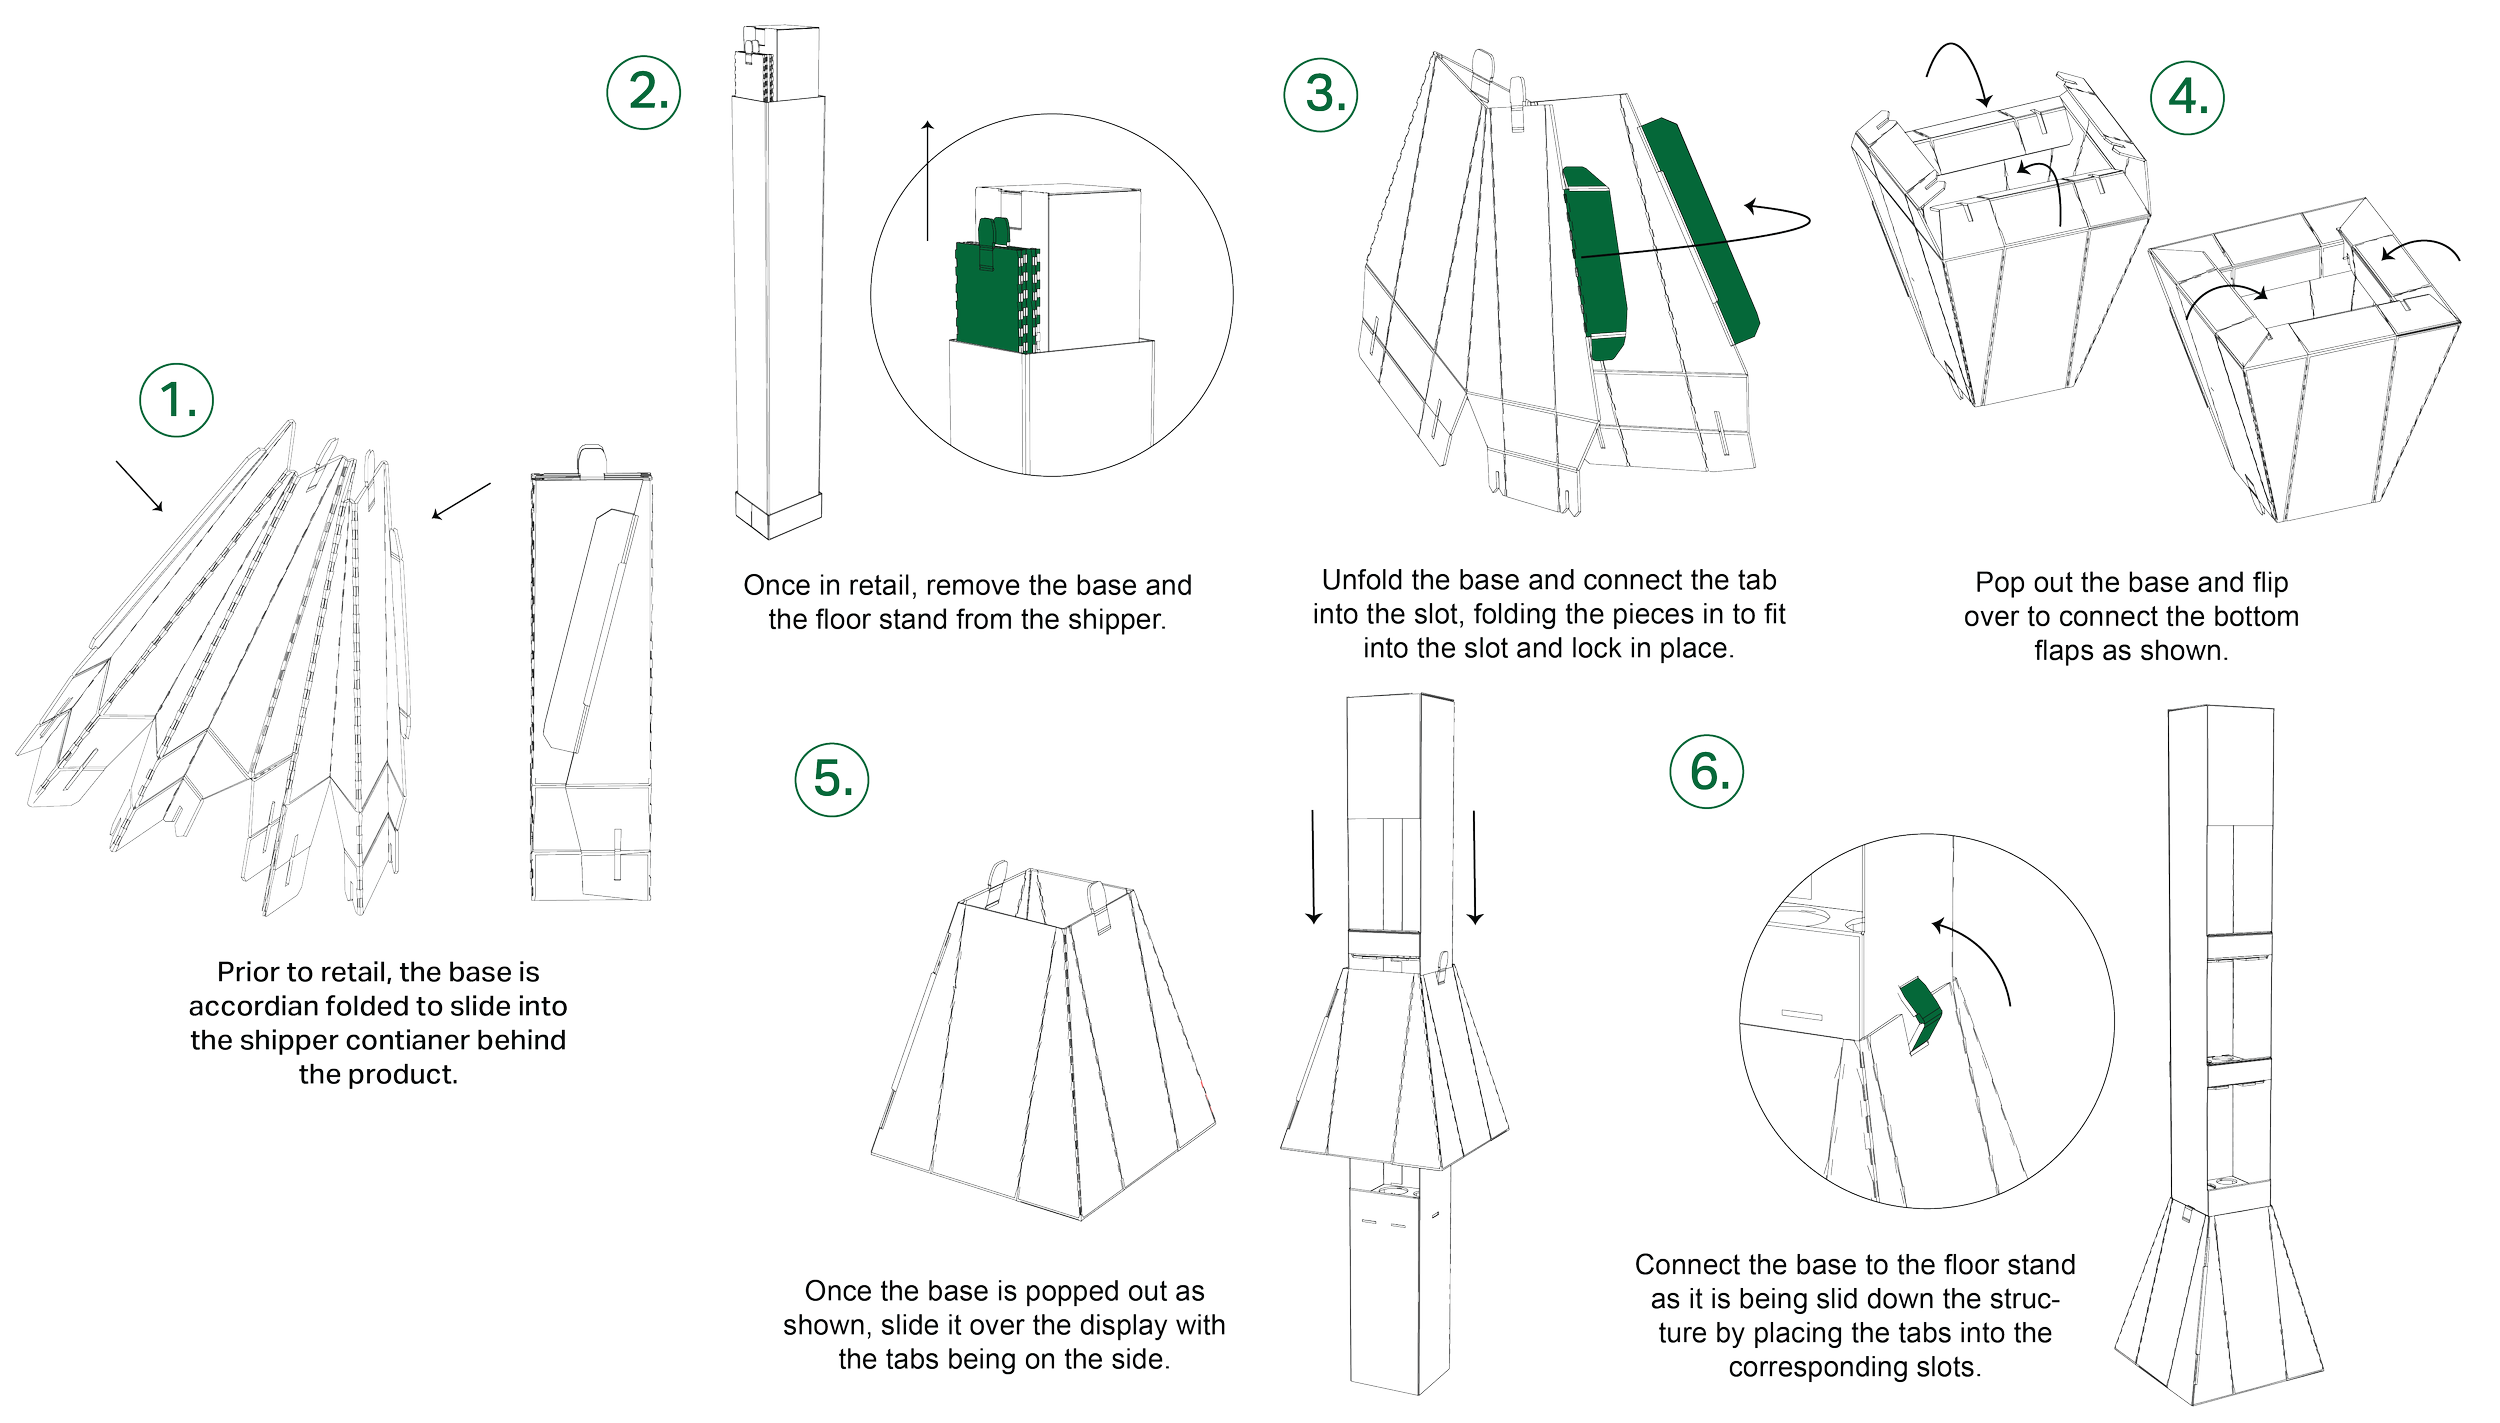
1. Reckitt Biofreeze Floorstand
The development of a new structure that allowed for a new innovated collapsible base, making the entire shippable display smaller and saving massive cost on freight and glue adhesive.

The Final Changes.
After multiple trials, the final design changes featured perf lines on each corner to allow the board to collapse into itself for transport.
Retail would attach using a tab instead of glue, and a tab locking technique to attach the base to the main shelving.
How it Works.
The Process.
This consisted a lot of trial and error, starting with redesigning the locking system of how the base would come together, then how it would attach to the display.
Also simultaneously trying to innovate how the base could take up less room in transit.

Original Base Design.
Final Production Base Design.
2. Publix Clorox Toilet Bomb Floorstand
Another project worked on from start to finish, created to highlight Clorox new toilet bomb product with a request of 12-18 total units of product with bright colorful graphics.

Plan O Gram and Rendering.
Clorox requested a Floorstand with a product mix of their toilet bombs.
Creating the POG, adding a divider filler to fill space after fitting a split mix of 18 total products.
Creating the initial render, based the “drop. brush. flush.” text and colors sent over from Clorox brand assets.
Revisions and Structure.
Clorox returned with feedback requesting the QR code and Clorox logo on both sides. They wanted product shots of both toilet bomb scents and the color slightly brighter.
They approved of the final structure and rendering, so an estimated build of materials was created shown below. This is currently being pitched to Publix.

Initial Rendering

Final Rendering


3. Additional Highlights
Below scroll to see more graphic and structure instruction work I completed for various display varieties. All developed using adobe creative cloud, programs I greatly improved on during my time here.

Meijer Ferrera Candy Full Pallet

Ghirardelli Betty Crocker Valentines QP

Meijer Baby Weeks Full Pallet

Meijer Women's Cold Weather Half Pallet
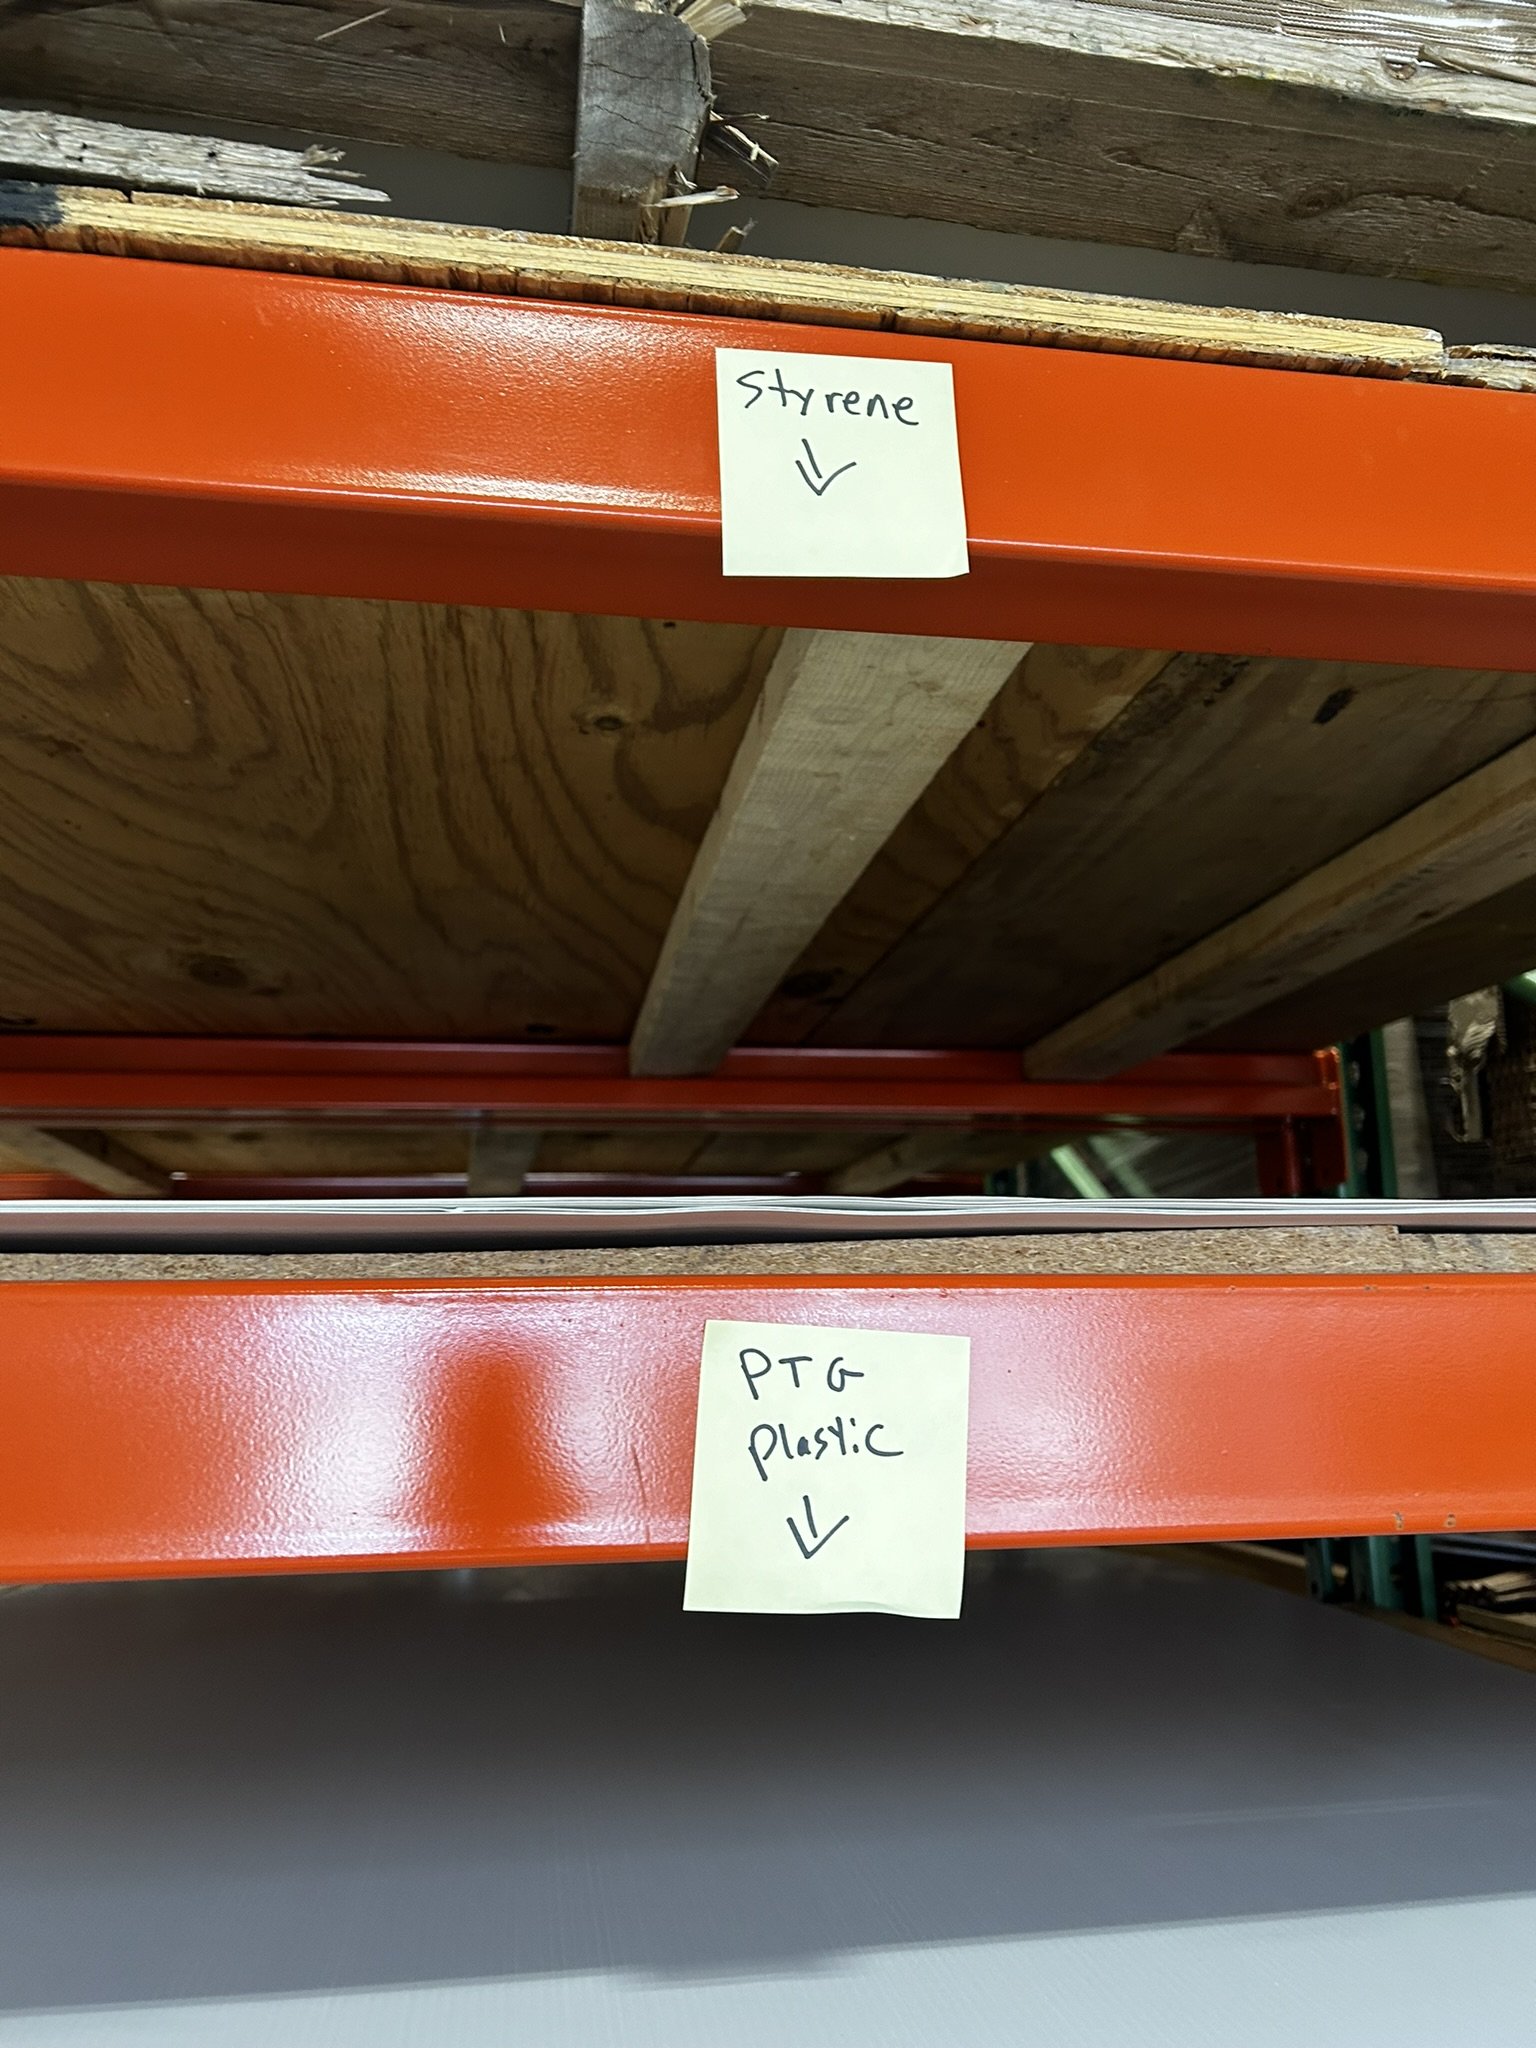
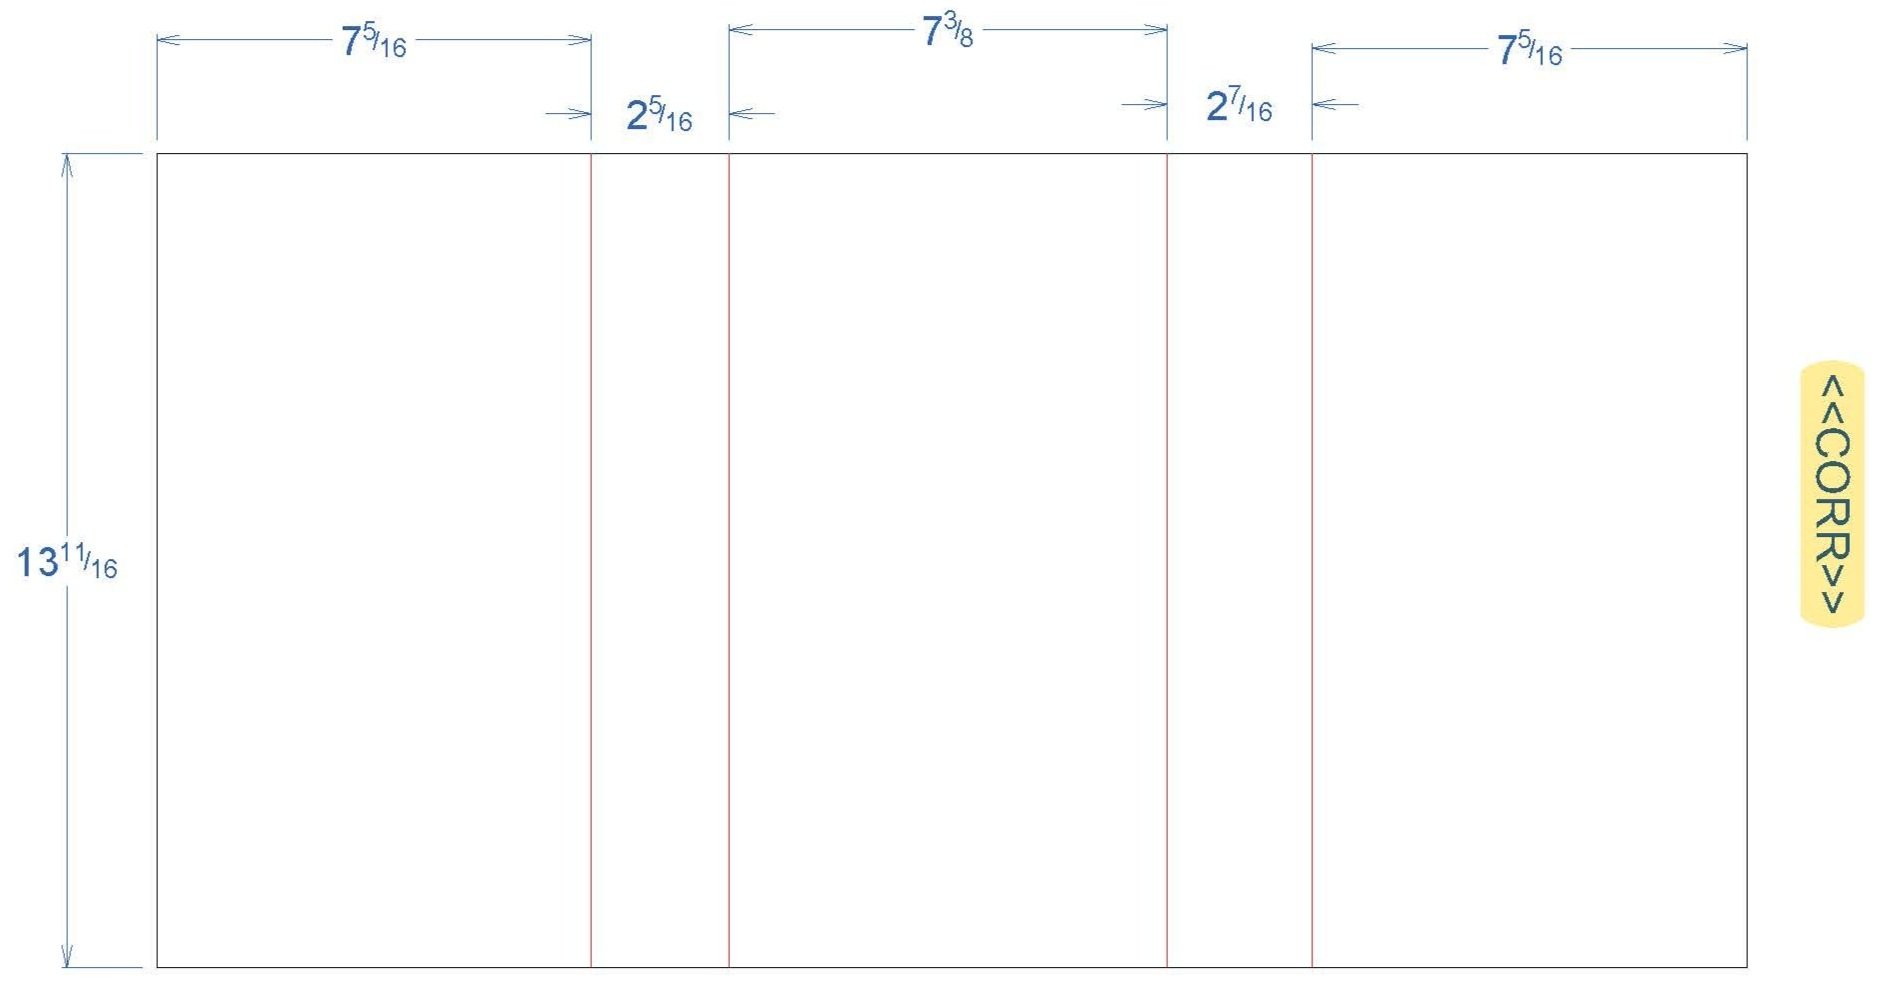
Previous Warehouse Labels (obscure, weak, unreliable, unattractive)
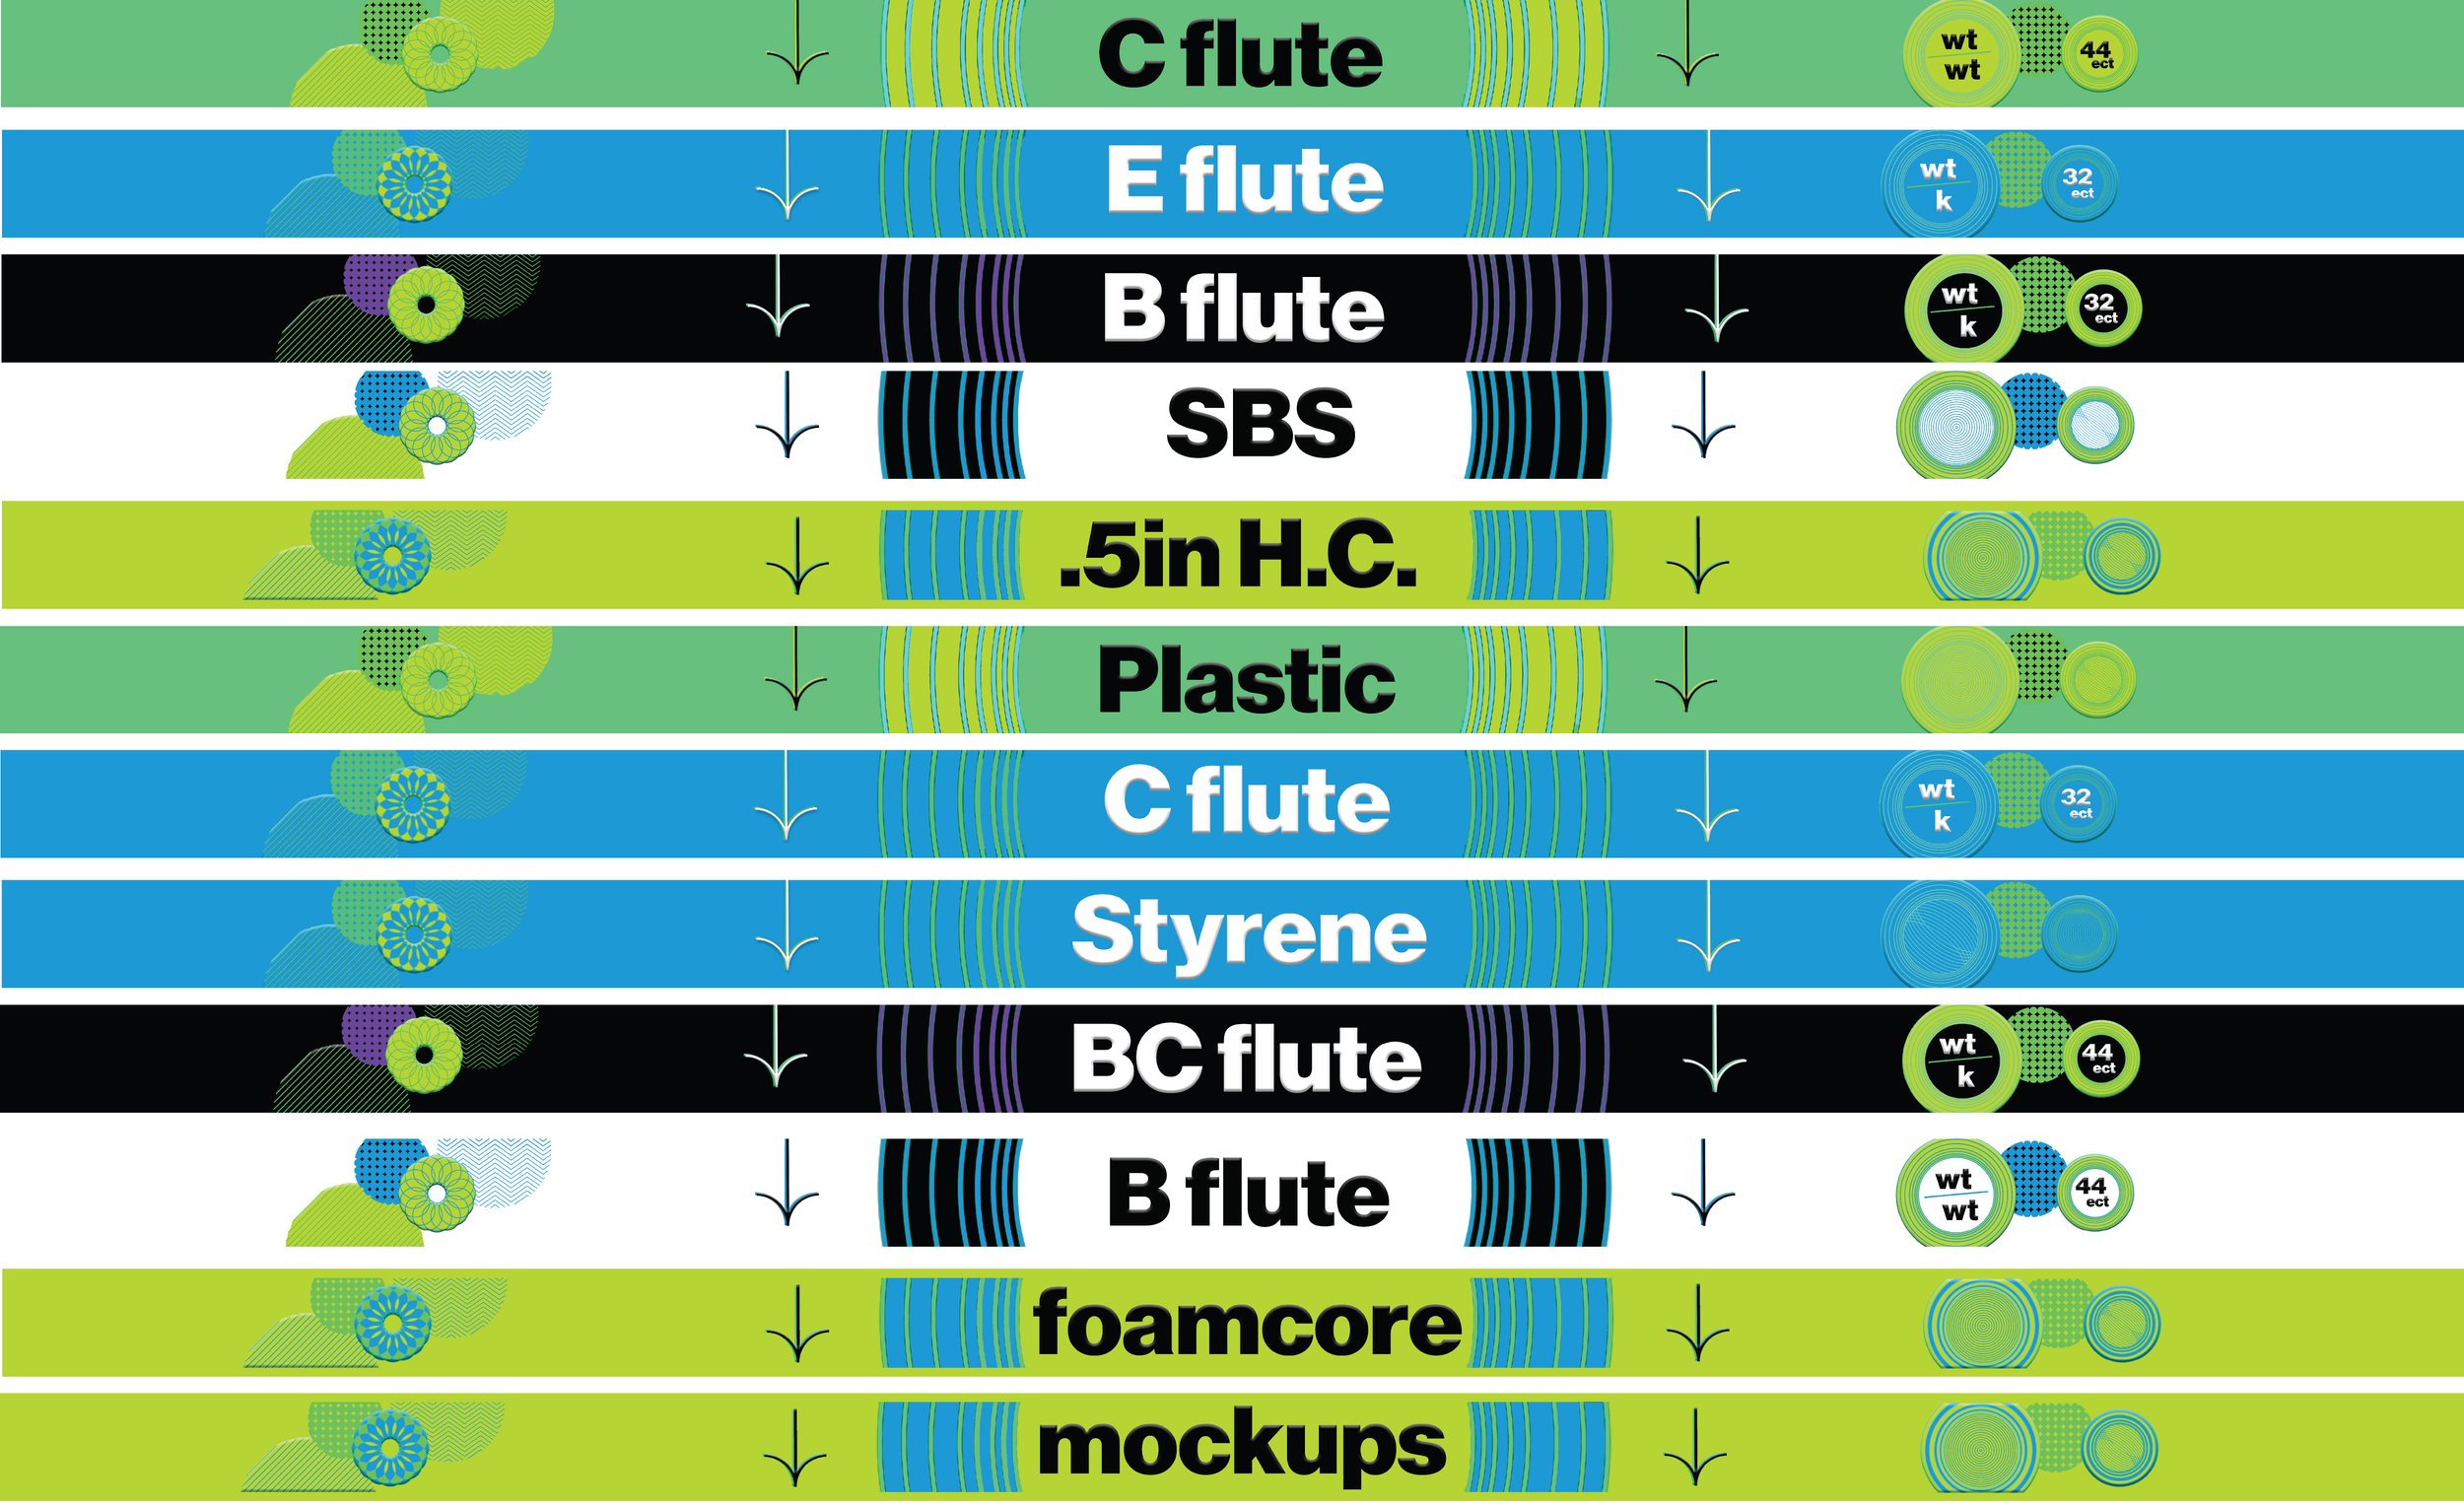
HH Global Brand Inspired Board Labels for Warehouse
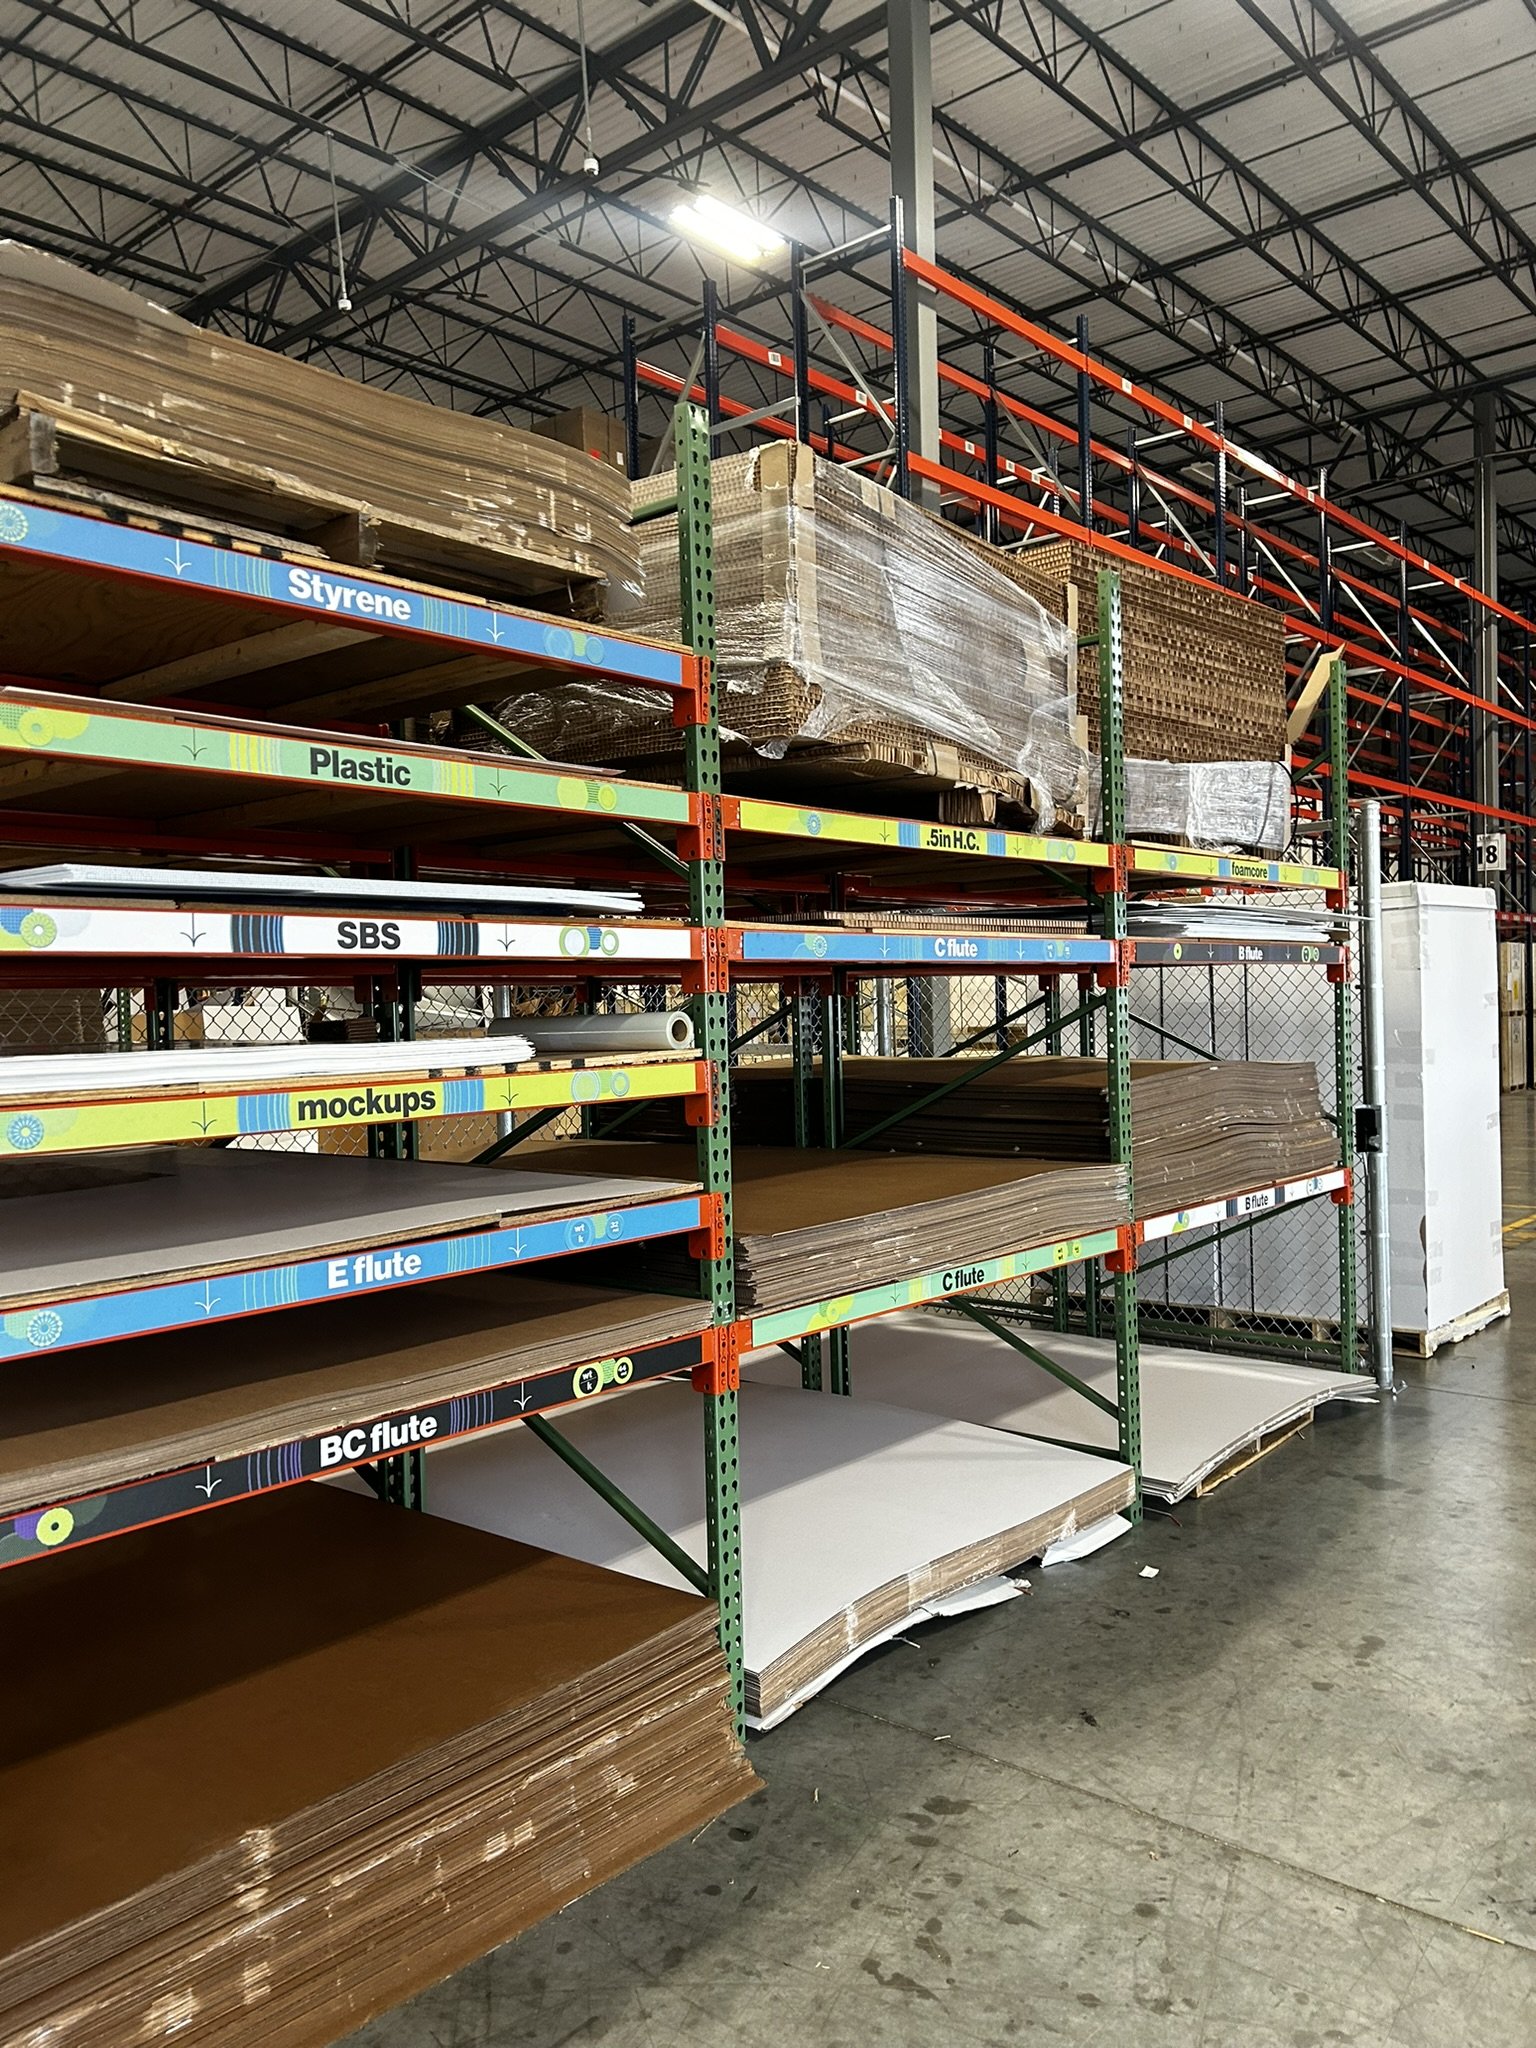
My Label Solution (visible, informational, organized, stable)

Printer Table Graphic based on HH Global Branding

HH Global Printer Table Graphic

Kroger Fall Air Full Pallet Pitch

In-Plant Assembly Kroger Gerber Pallet Instructions 1/2

In-Plant Assembly Kroger Gerber Pallet Instructions 2/2

Retail Assembly Kroger Gerber Pallet Instructions
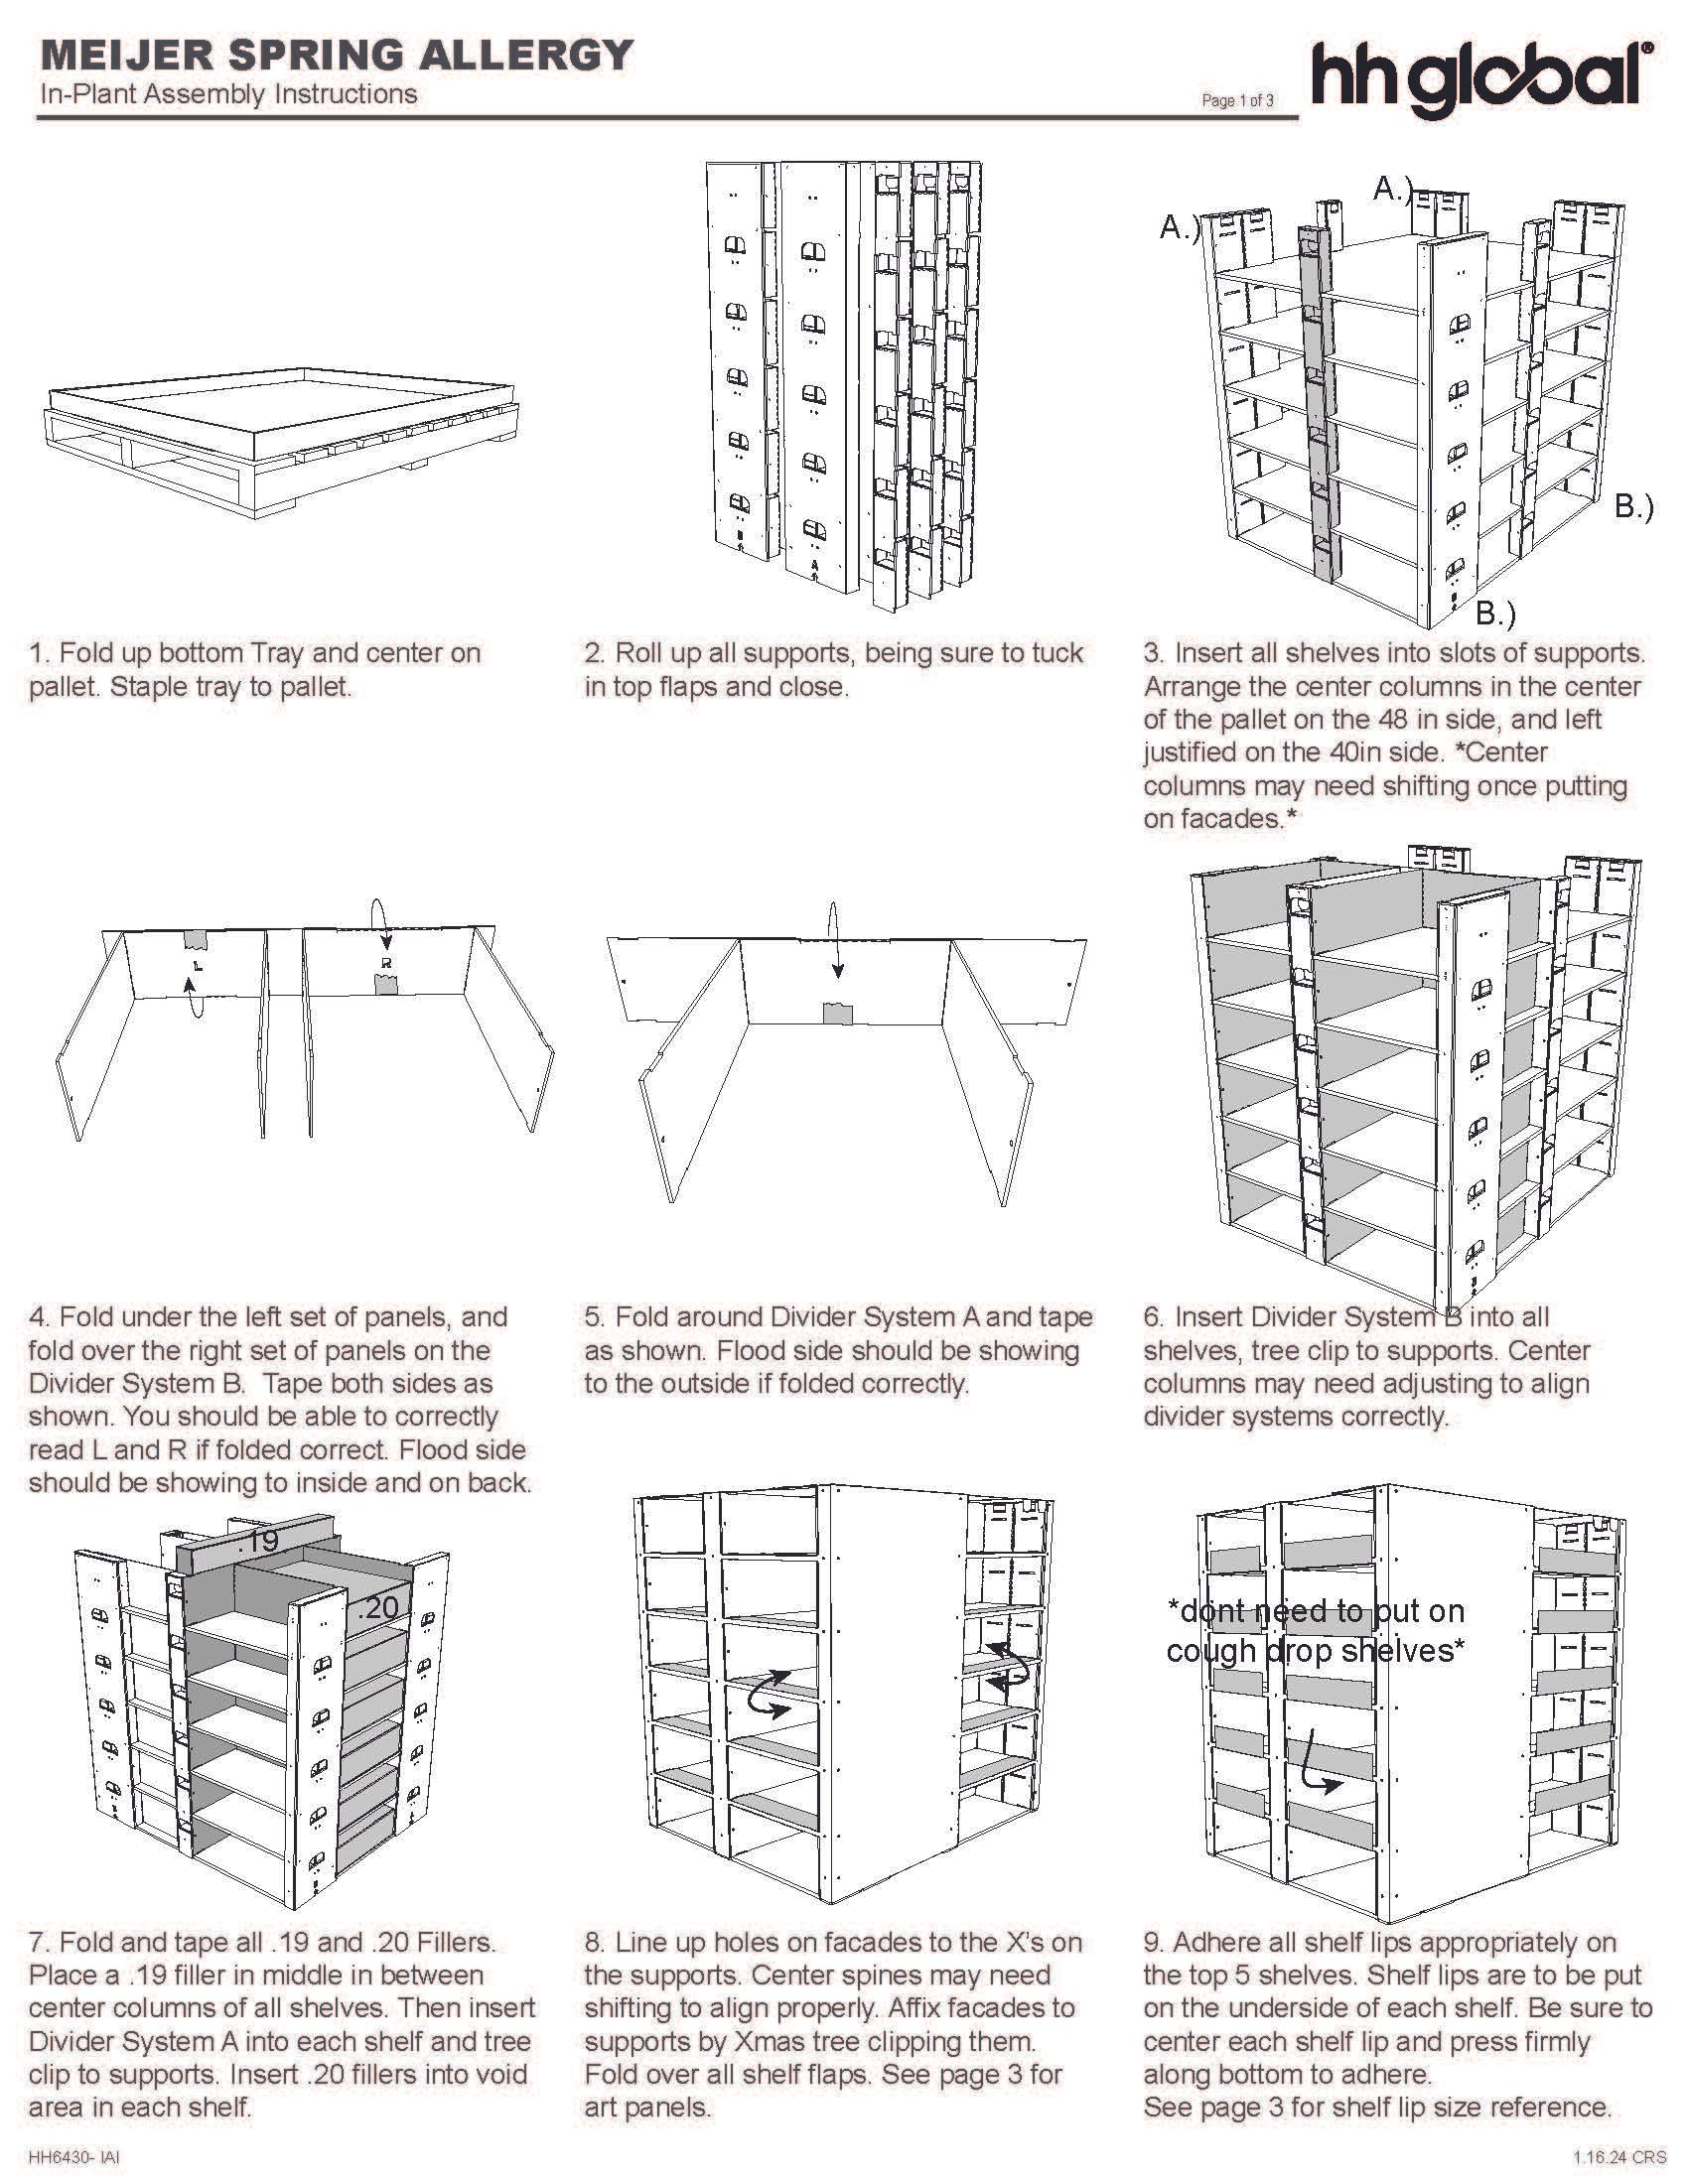
In-Plant Assembly Meijer Spring Allergy Instructions 1/3

In-Plant Assembly Meijer Spring Allergy Instructions 2/3
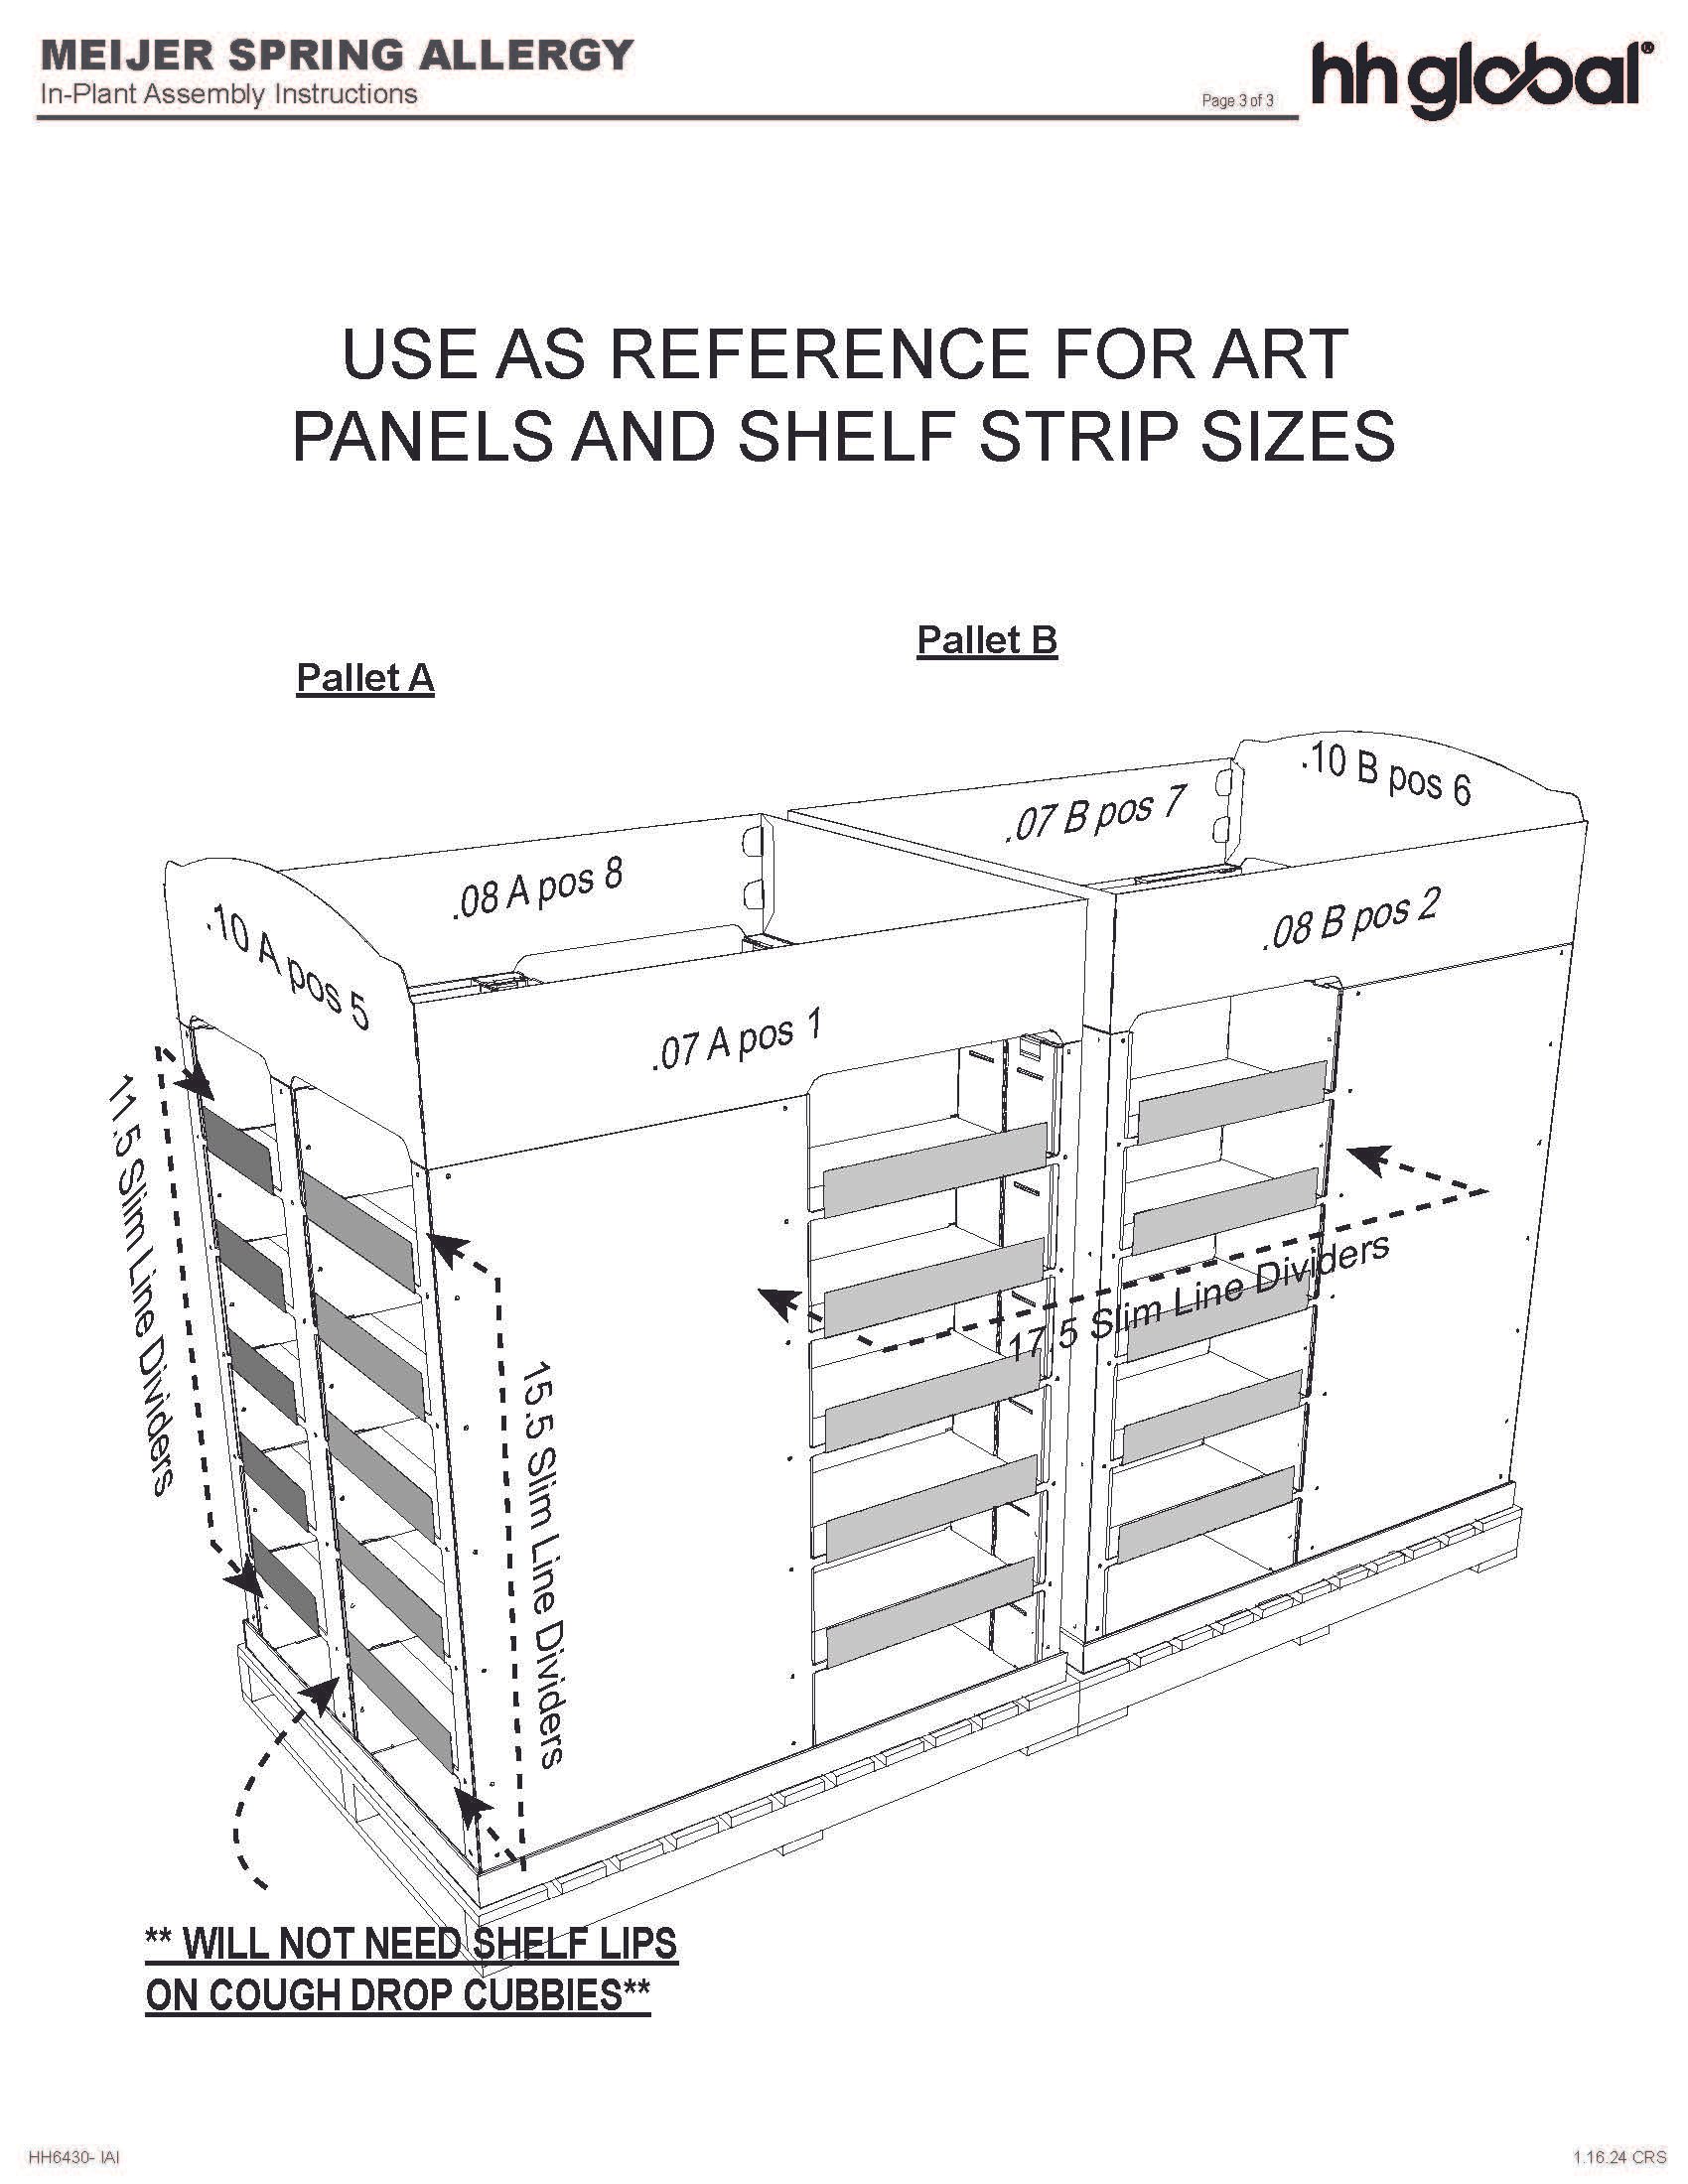
In-Plant Assembly Meijer Spring Allergy Instructions 3/3

Retail Assembly Meijer Spring Allergy Instructions
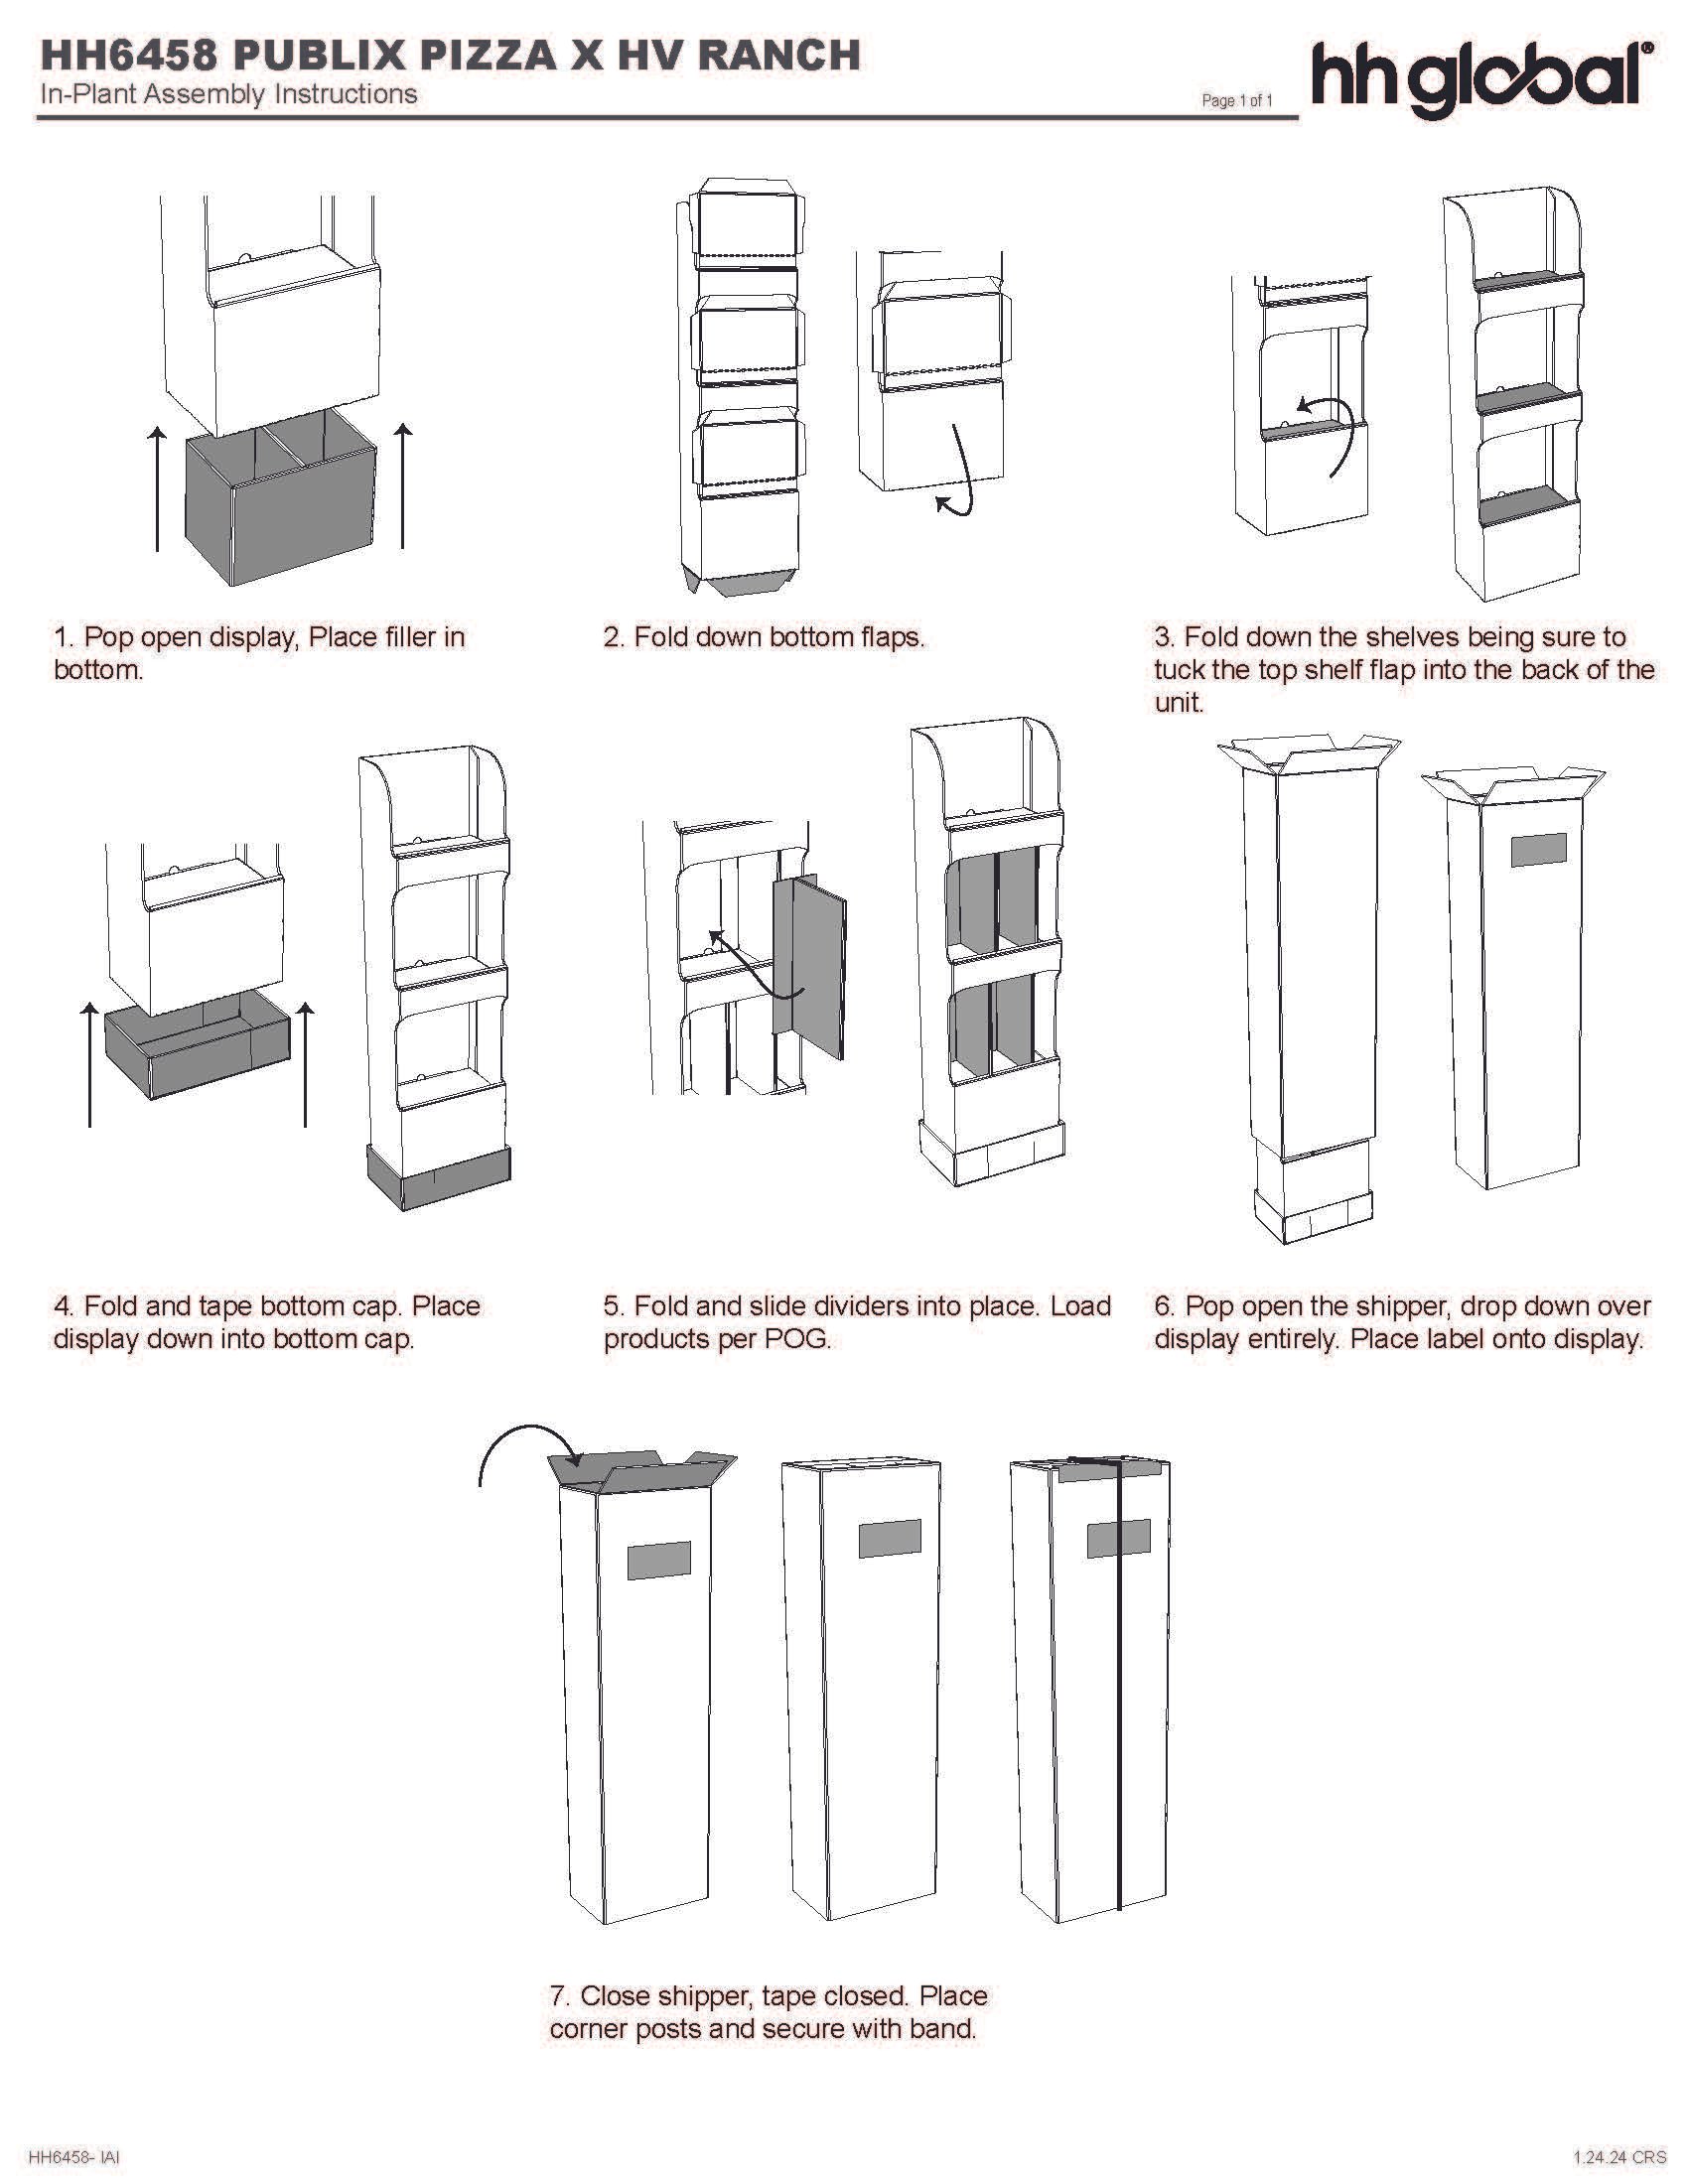
In-Plant Assembly Public Pizza x Hidden Valley Ranch Instructions
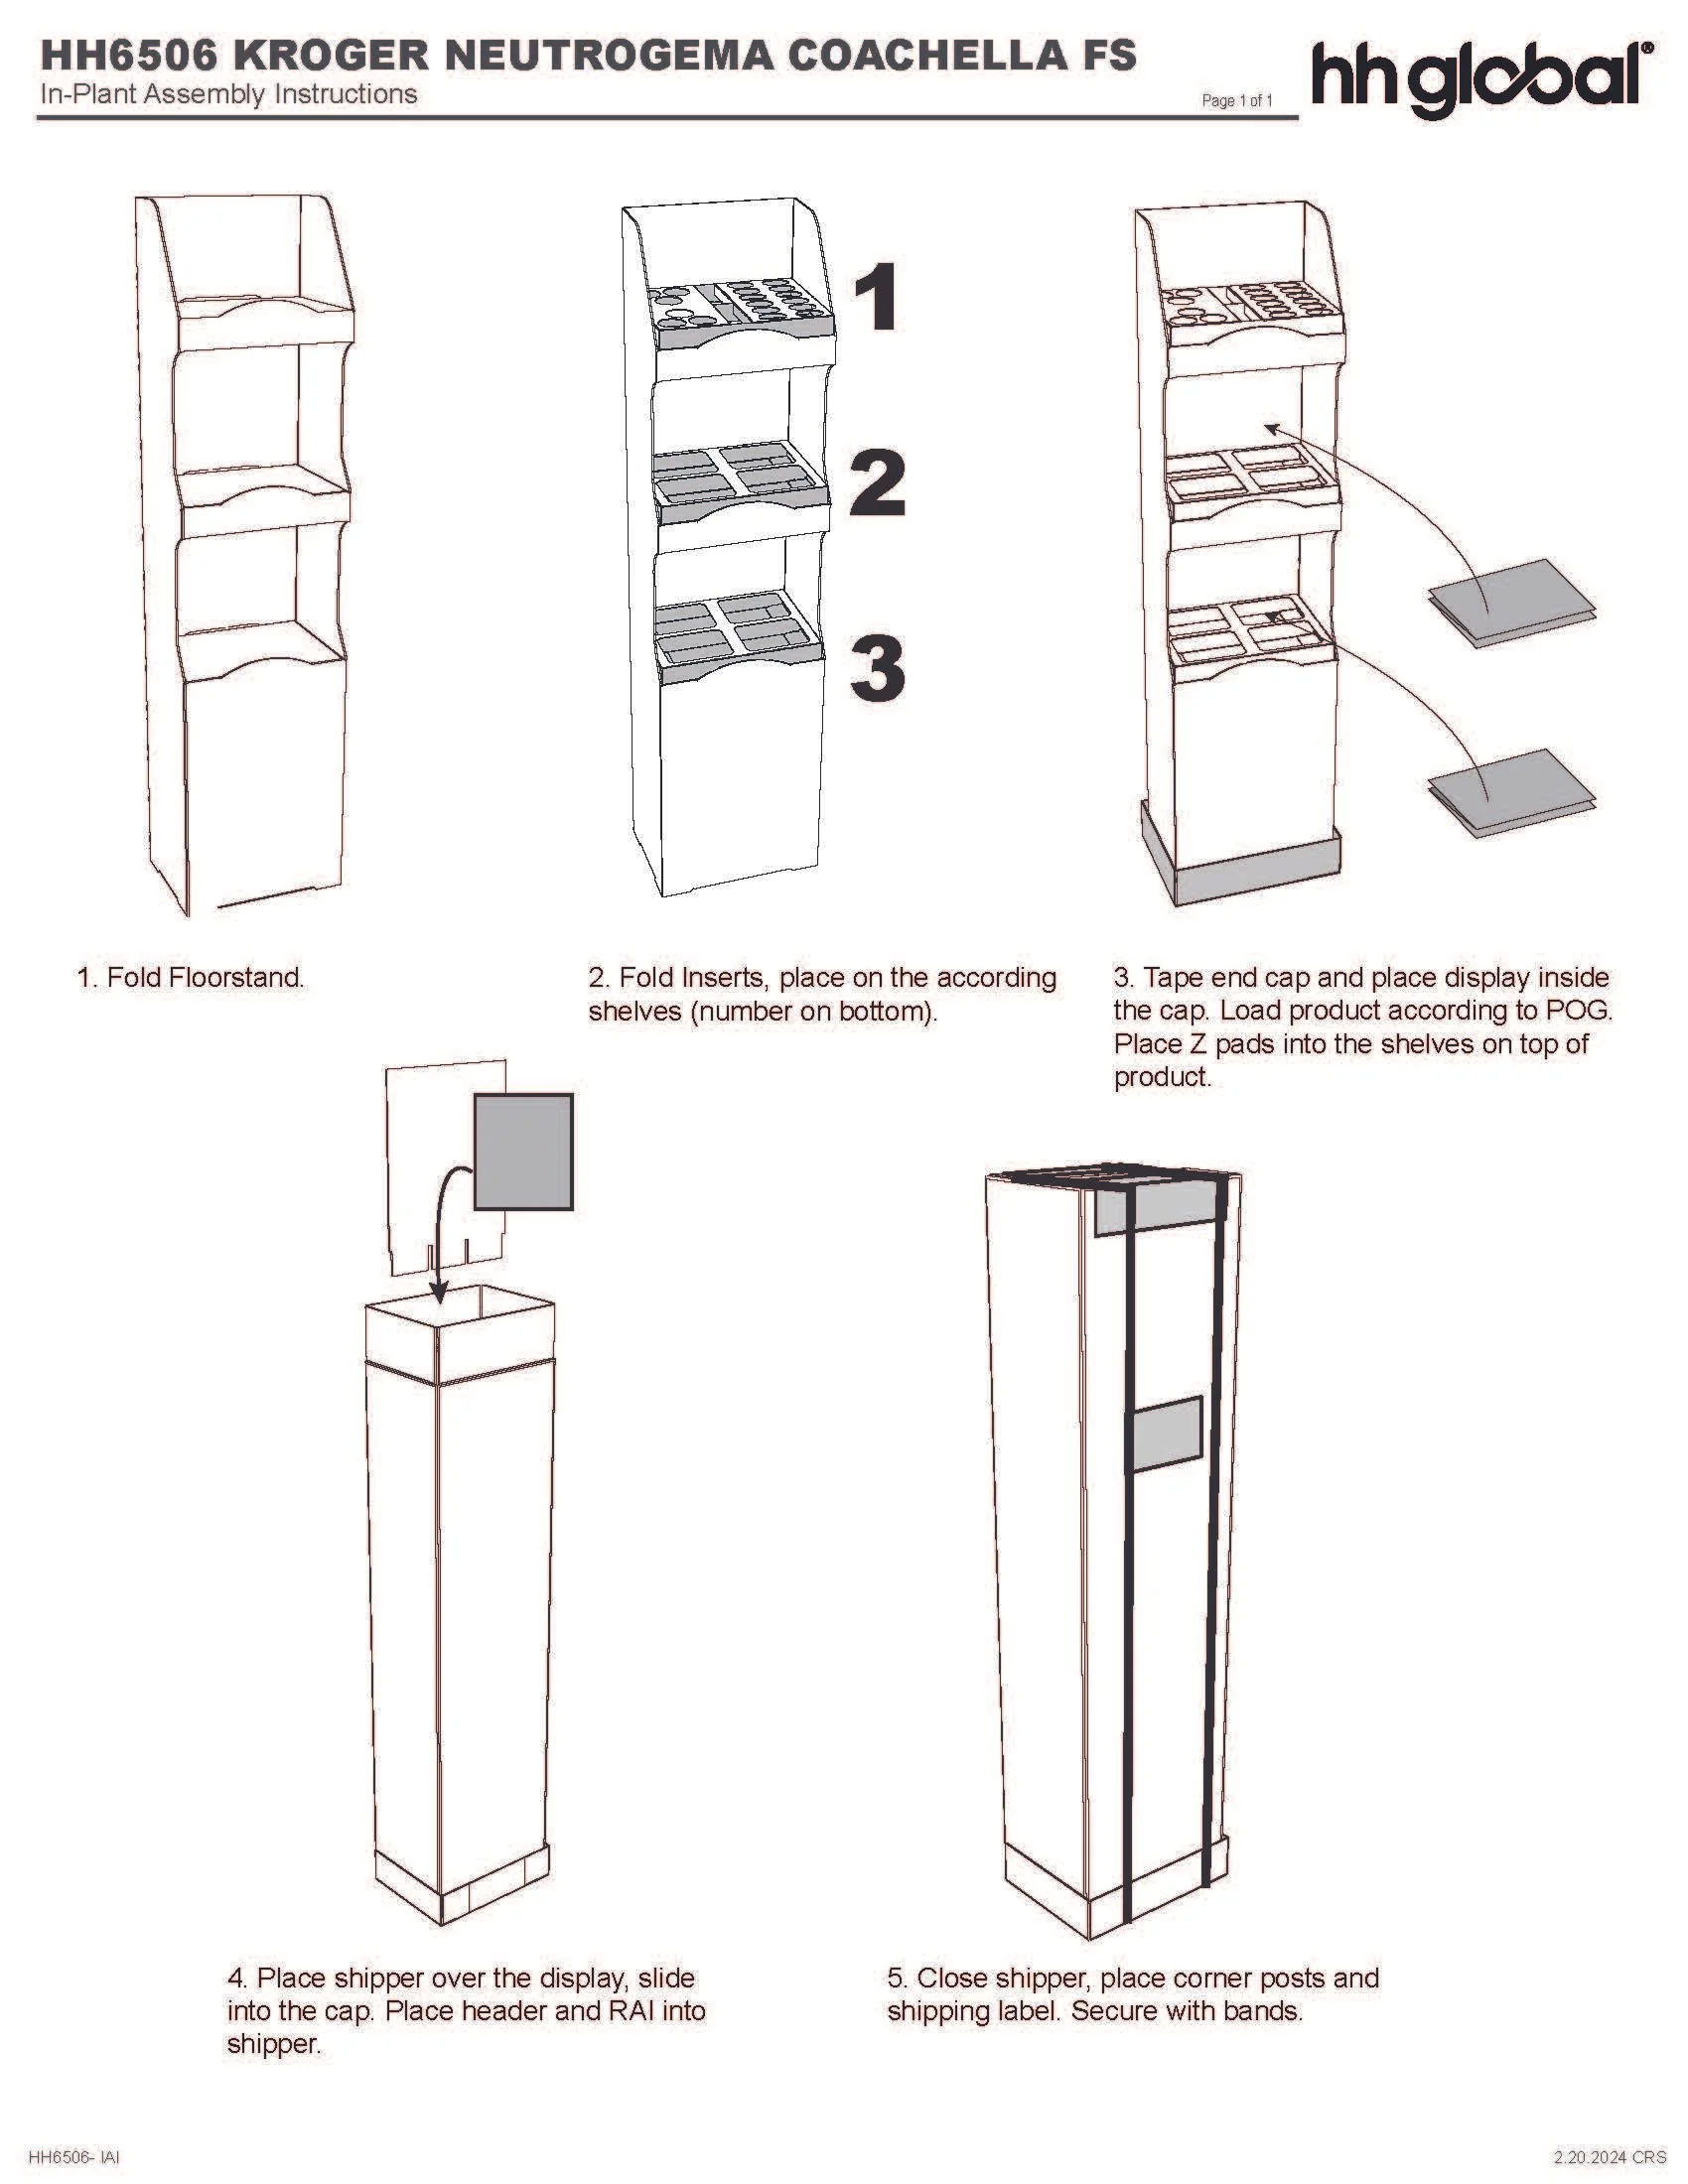
In-Plant Assembly Kroger Neutrogena Coachella Floorstand Instructions

Retail Assembly Kroger Neutrogena Coachella Floorstand Instructions
All work completed and displayed above is property of HH Global.
Section III | My Personal Project.
Section three will explore the personal project I worked towards throughout this semester with help from my mentors. This project was outlined based on what I have learned during my co-op and explored more areas of product opportunity in the corrugated cardboard industry. Click the button below to see that process.